Hiện chi tiết sản phẩm dùng Angular hướng dẫn tạo component để hiện chi tiết 1 sản phẩm lấy từ server về, hiện thêm các sản phẩm liên quan…
Yêu cầu
- Lấy chi tiết sản phẩm theo tham số, trình bày thông tin sản phẩm và tạo link
- Hiện sản phẩm liên quan, list ý kiến, form thêm ý kiến
- Trước khi thực hiện bài này, hãy xem bài sau và thực hiện theo đó trước nhé: https://longnv.name.vn/thuc-tap-angular/hien-san-pham-theo-loai-dung-angular
Chuẩn bị
- Chạy project Angular : Vào folder project và chạy lệnh sau
ng serve -o - Chạy Json server: Vào folder project và chạy lệnh
json-server -w db.json
Tạo component chi tiết sản phẩm
Trong folder project , chạy lệnh ng g c SanPhamChiTiet
Tạo routing cho component
Chức năng hiện chi tiết 1 sản phẩm là chức năng mới, cần có địa chỉ (path) riêng để hiện thông tin. Do đó chúng ta cần định nghĩa routing mới để dẫn vào component . Mở file app-routing.module.ts và định nghĩa path sp trong mục routes:

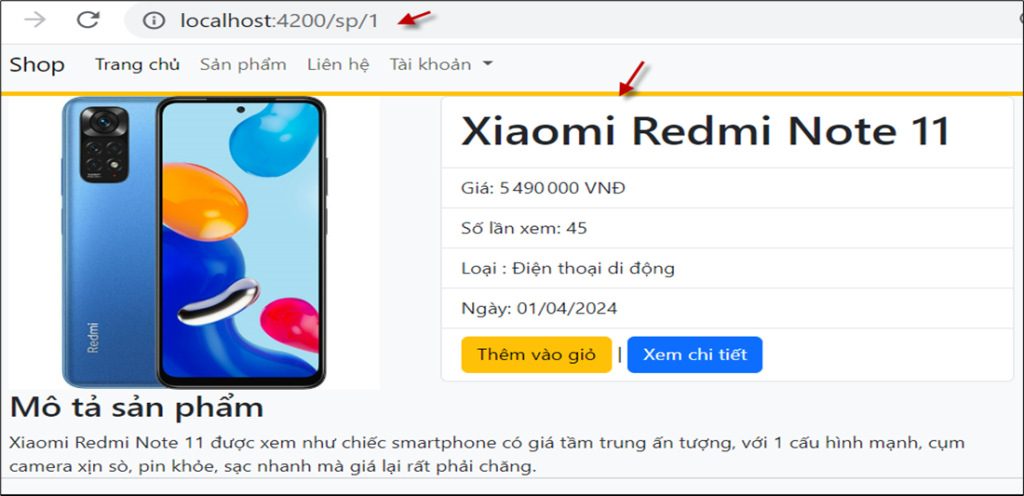
Test: Nhập địa chỉ http://localhost:4200/sp/1 sẽ thấy component chi tiết sản phẩm hiện ra

Tạo hàm trong service để request dữ liệu từ server
Service của Angular là nơi viết các hàm tập trung phục vụ các component. Mở file du-lieu.service.ts để tạo hàm request chi tiết 1 sản phẩm theo id.
//du-lieu.service.ts
getSanPhamChiTiet(idSP:Number=0){
    var url = `http://localhost:3000/sanpham?id=${idSP}`;
    return this.h.get<ISanpham[]>(url);
}
Gọi hàm trong trong servive từ component
Trong component chi tiết sản phẩm, chúng ta gọi hàm trong service để gán vào các biến để cho view hiện ra. Mở file san-pham-chi-tiet.component.ts và code:
//san-pham-chi-tiet.component.ts
import { Component } from '@angular/core';
import { ActivatedRoute } from '@angular/router';
import { DuLieuService } from '../du-lieu.service';
import { ISanpham } from '../isanpham';
@Component({ selector: 'app-san-pham-chi-tiet',
  templateUrl: './san-pham-chi-tiet.component.html',
  styleUrls: ['./san-pham-chi-tiet.component.css']
})
export class SanPhamChiTietComponent {
  constructor(
     private d:DuLieuService,
     private route:ActivatedRoute
   ) { }
  spChiTiet:ISanpham={
    id:0, tensp:"", giasp:0,
    solanxem:0, hinh:"",
    mota:"", hot:0, ngay:"", idLoai:0
  };
  idSP:number=0;
  idLoai:number=0;
  tenLoai:string="";
  ngOnInit(): void {
    this.idSP = Number(this.route.snapshot.params['id']);
    this.d.getSanPhamChiTiet(this.idSP).subscribe (
      res => {
        this.spChiTiet  = res[0];
        this.idLoai = this.spChiTiet.idLoai;
        this.d.getTenLoaiSanPham(this.idLoai).subscribe(
          d => this.tenLoai = d[0]['tenLoai']
        );
      }//res
    );
  }
}
Hiện sản phẩm trong view của component
Giờ thì đến lúc hiện chi tiết sản phẩm dùng Angular. Dữ liệu đã có trong component rồi, chỉ việc mở file html của component cho hiện các giá trị ra . Mở san-pham-chi-tiet.component.html và code:
<!-- san-pham-chi-tiet.component.html -->
<div class="container chitietsp">
<div class="row">
    <div class="col-md-5">
       <img style="height: 300px;" src="{{spChiTiet.hinh}}">
     </div>
    <div class="col-md-7">
      <ul class="list-group lg">
       <li class="list-group-item">
          <h1>{{spChiTiet.tensp}}</h1>
       </li>
       <li class="list-group-item">
           Giá: {{spChiTiet.giasp|number:'1.0-0':'fr' }} VNĐ
       </li>
       <li class="list-group-item">
          Số lần xem: {{spChiTiet.solanxem}}
       </li>
       <li class="list-group-item">
           Loại : {{tenLoai}}
       </li>
       <li class="list-group-item">
          Ngày: {{spChiTiet.ngay|date:"dd/MM/Y"}}
       </li>
       <li class="list-group-item" >
          <button class="btn btn-warning">Thêm vào giỏ</button> |
          <a class="btn btn-primary" href="#">Xem chi tiết </a>
       </li>
      </ul>
    </div>
</div>
<div class="row">
    <h3>Mô tả sản phẩm</h3>
    <div class="text-justify">{{spChiTiet.mota}}</div> <hr>
</div>
<div class="row"> <!-- list bình luận --> </div>
<div class="row"> <!-- form thêm bình luận --> </div>
</div>
Test:

Tạo link đến chức năng chi tiết sản phẩm
Tạo link đến chi tiết sản phẩm từ trong component sản phẩm bán chạy
Mở san-pham-ban-chay.component.html và sửa link Xem chi tiết để được như sau
<a href=”#” routerLink=”/sp/{{sp.id}}” >Xem chi tiết</a>
Nếu muốn, bạn có thể tạo link tương tự bao quanh tên sản phẩm, và hình sản phẩm.
Tạo link đến chi tiết sản phẩm từ trong component sản phẩm mới
Mở san-pham-moi.component.html và thực hiện tương tự như trong sản phẩm bán chạy
Tạo link đến chi tiết sản phẩm từ trong component sản phẩm theo loại
Mở san-pham-theo-loai.component.html và thực hiện tương tự như trong sản phẩm bán chạy
Sản phẩm liên quan
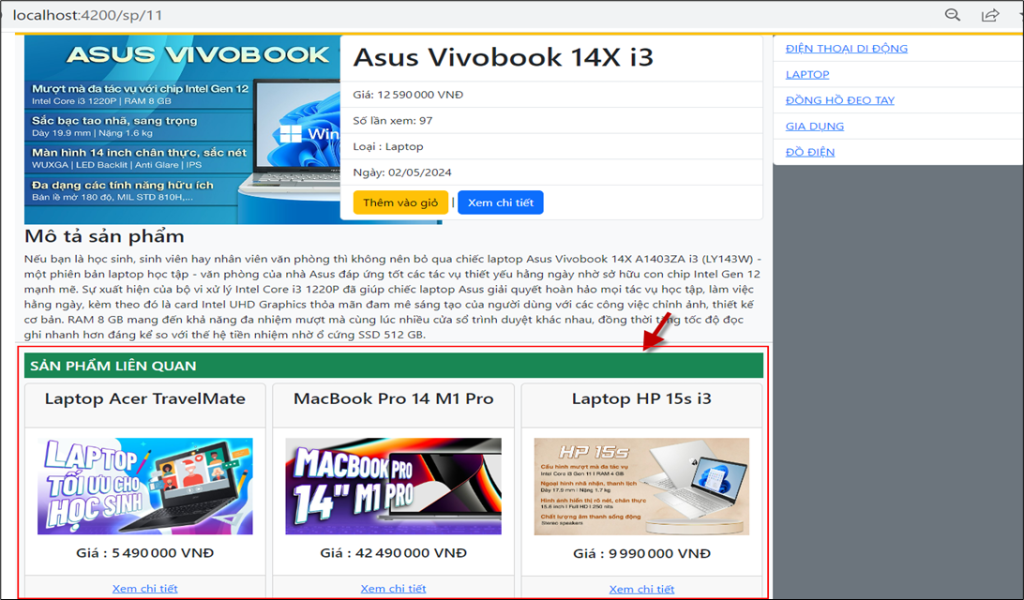
Khi hiện chi tiết 1 sản phẩm, thường cần phải hiện thêm các sản phẩm liên quan. Thực hiện như sau:
1. Tạo component sản phẩm liên quan
Chạy lệnh trong folder project : ng g c SanPhamLienQuan
2. Nhúng component và truyển tham số
Nhúng vào sản phẩm chi tiết và truyền 2 tham số idLoai, số SP . Mở file san-pham-chi-tiet.component.html và nhúng

3. Tiếp nhận tham số và gọi hàm
Mở file san-pham-lien-quan.component.ts và code để
- Khai báo 2 tham số truyền vào cho component hoạt động là idLoai và soSP
- Khai báo biến listSanPham sẽ nhận từ server , dùng để hiện trong view
- Gọi hàm getSanPhamLienQuan và truyền tham số idLoai và soSP trong sự kiện ngOnChanges (hàm sẽ chạy khi các tham số đầu vào đổi giá trị – gán từ component cha)
//san-pham-lien-quan.component.html
import { Component } from '@angular/core';
import { Input } from '@angular/core';
import { DuLieuService } from '../du-lieu.service';
import { ISanpham } from '../isanpham';
import { SimpleChanges} from '@angular/core';
@Component({selector: 'app-san-pham-lien-quan',
  templateUrl: './san-pham-lien-quan.component.html',
  styleUrls: ['./san-pham-lien-quan.component.css']
})
export class SanPhamLienQuanComponent {
  @Input() idLoai:number =0;
  @Input() soSP:number =0;
  listSanPham:ISanpham[]=[];
  constructor( private d:DuLieuService  ) {}
  ngOnInit(): void { };
  ngOnChanges(changes: SimpleChanges) {
    console.log(changes);
    this.d.getSanPhamLienQuan(this.idLoai, this.soSP).subscribe(
      data => { this.listSanPham= data; console.log(data); }
    );
  }
}//export
4. Định nghĩa hàm lấy dữ liệu từ server
//du-lieu.service.ts
getSanPhamLienQuan(idLoai:number=0, soSP:number=0){
    var url = `http://localhost:3000/sanpham?idLoai=${idLoai}&_limit=${soSP}`;
    return this.h.get<ISanpham[]>(url);
}
5. Hiện dữ liệu trong view
<!-- san-pham-lien-quan.compoment.html-->
<h5 class="bg-success p-2 text-white">SẢN PHẨM LIÊN QUAN</h5>
<div class="row  row-cols-1  row-cols-md-2 row-cols-xl-3 g-2">
    <div class="col" *ngFor="let sp of listSanPham" >
        <div class="card text-center">
            <div class="card-header">
                <h3 class="h4" style="height:45px">{{sp.tensp}}</h3>
            </div>
            <div class="card-body">
              <img class="img-fluid" src="{{sp.hinh}}">
              <p class="h5 mt-3">
                Giá : {{sp.giasp|number:'1.0-0':'fr' }} VNĐ
              </p>
            </div>
            <div class="card-footer">
                <a href="#" routerLink="/sp/{{sp.id}}">Xem chi tiết</a>
            </div>
        </div>
    </div>
</div>
Test

Comment sản phẩm
1. Tạo table trên json server
2. Tạo component comment
3. Nhúng component vào chi tiết sản phẩm
4. Tạo form comment sản phẩm
5. Gửi dữ liệu lên server để lưu
6. Hiện danh sách comment của sản phẩm
Phù, mệt không? Nếu thế thì ngủ đi 🙂 . Thầy thì mệt quá rồi. Khi nào cần tra xem thêm tài liệu chính thức của Angular thì lên đây https://angular.io/docs
Sau đây là các bài trong series thực tập Angular bạn cần thực hiện tuần tự từ trên xuống để có project nhé:
- Đôi điều về Angular – P1
- Đôi điều về Angular – P2
- Hiện sản phẩm bán chạy
- Hiện sản phẩm mới dùng Angular
- Hiện loại sản phẩm dùng Angular
- Hiện sản phẩm theo loại dùng Angular
- Hiện chi tiết sản phẩm dùng Angular


