Hiện sản phẩm theo loại dùng Angular hướng dẫn thực hiện code để tạo component hiện các sản phẩm trong 1 loại nào đó và phân trang….
Yêu cầu
- Lấy sản phẩm theo loại , có hiện tên loại, link đến chức năng này từ tên loại đã hiện trên layout
- Thực hiện phân trang danh sách sản phẩm
- Trước khi thực hiện bài này, hãy xem bài sau và thực hiện theo đó trước nhé: https://longnv.name.vn/thuc-tap-angular/hien-loai-san-pham-dung-angular
Chuẩn bị thực hiện
- Chạy project Angular : Vào folder project và chạy lệnh sau
ng serve -o - Chạy Json server: Vào folder project và chạy lệnh
json-server -w db.json
Tạo component sản phẩm theo loại
Trong folder project chạy lệnh ng g c SanPhamTheoLoai
Tạo routing cho component
Trên trang chủ, user nhắp tên 1 loại, sẽ hiện ra danh sách các sản phẩm trong loại vừa mới nhắp. Do đó giờ cần đến địa chỉ (path) mới. Mở file app-routing.module.ts và định nghĩa path loai trong mục routes (path có tham số là id của loại)

Test: Mở địa chỉ http://localhost:4200/loai/1 và thấy component hiện ra là đúng.

Tạo hàm trong service để request dữ liệu từ server
Giờ thì tạo hàm để lấy dữ liệu từ server xuống. Chúng ta định nghĩa trong service cho có tính tập trung. Định nghĩa 2 hàm, 1 hàm lấy sản phẩm của loại, còn 1 hàm sẽ lấy tên loại từ server xuống.
//du-lieu.service.ts
getSanPhamTheoLoai(idLoai:Number=0) {
    var url = `http://localhost:3000/sanpham?idLoai=${idLoai}&_sort=ngay&_order=desc`;
    return this.h.get<any>(url, {observe: 'response'});
}
getTenLoaiSanPham(idLoai:Number=0){
    var url = `http://localhost:3000/loaisp?id=${idLoai}`;
    return this.h.get<ILoaisp[]>(url);
}
Gọi hàm trong trong servive từ component
Trong component sản phẩm theo loại , gọi các hàm trong service để có dữ liệu mà trình bày. Mở file san-pham-theo-loai.component.ts và code:
//san-pham-theo-loai.component.ts
import { Component } from '@angular/core';
import { ActivatedRoute } from '@angular/router';
import { DuLieuService } from '../du-lieu.service';
import { ISanpham } from '../isanpham';
@Component({ selector: 'app-san-pham-theo-loai',
  templateUrl: './san-pham-theo-loai.component.html',
  styleUrls: ['./san-pham-theo-loai.component.css']
})
export class SanPhamTheoLoaiComponent {
  listSanPham:ISanpham[]=[];
  tenLoai:string="";
  idLoai:number=0;
  constructor(
     private d:DuLieuService,
     private route:ActivatedRoute
  ) { }
  ngOnInit(): void {
    this.idLoai = Number( this.route.snapshot.params['id'] );
    this.d.getTenLoaiSanPham(this.idLoai).subscribe (
      loai =>  { this.tenLoai= loai[0].tenLoai; }
    );
    this.d.getSanPhamTheoLoai(this.idLoai).subscribe (
      res =>  this.listSanPham = res
    );
  }
}
Hiện sản phẩm theo loại dùng Angular ra view
Sau khi component gọi hàm, các biến sẽ có giá trị , giờ thì trong view sẽ hiện ra . Chúng ta sử dụng card-group của bootstrap 5: https://getbootstrap.com/docs/5.3/components/card/#card-groups
<!-- san-pham-theo-loai.component.html -->
<h2 class="bg-success p-2 text-white h3">
    SẢN PHẨM TRONG LOẠI {{ tenLoai | uppercase}}
</h2>
<div class="row  row-cols-1  row-cols-md-2 row-cols-xl-3 g-2">
    <div class="col" *ngFor="let sp of listSanPham" >
        <div class="card text-center">
            <div class="card-header">
                <h3 class="h4" style="height:45px">{{sp.tensp}}</h3>
            </div>
            <div class="card-body">
              <img class="img-fluid" src="{{sp.hinh}}">
              <p class="h5 mt-3">
                 Giá : {{sp.giasp|number:'1.0-0':'fr' }} VNĐ
              </p>
            </div>
            <div class="card-footer">
                <a href="#">Xem chi tiết</a>
            </div>
        </div>
    </div>
</div>
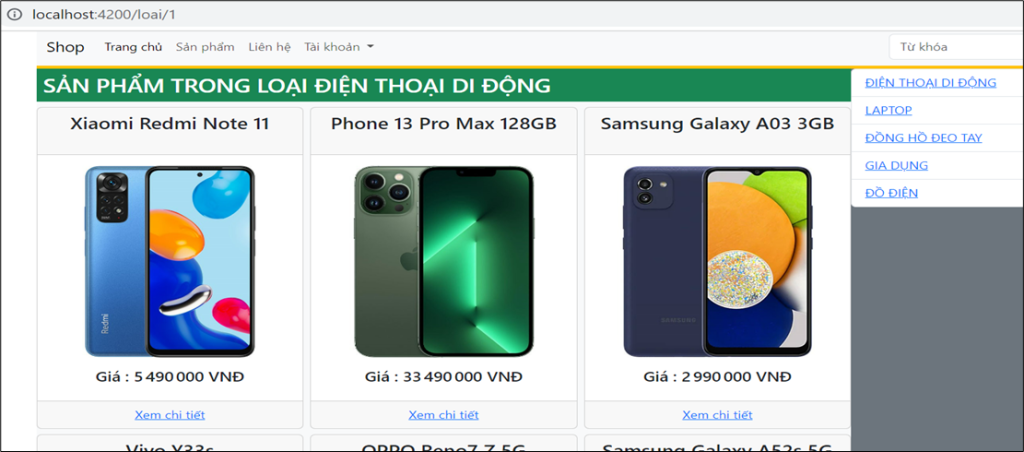
Xem thử kết quả: http://localhost:4200/loai/1 sẽ thấy dữ liệu hiện ra theo id của loại:

Link đến chức năng hiện sản phẩm theo loại
Tại tên các loại trên layout, chúng ra tạo link đến chức năng này. Mở file view cac-loai.component.html để tạo link
<!-- cac-loai.component.html -->
<ul class="list-group">
    <li class="list-group-item py-2" *ngFor="let loai of listLoaiSP">
      <a href="/loai/{{loai.id}}"> {{loai.tenLoai | uppercase }}</a>
    </li>
</ul>
Thực hiện phân trang
Phân trang là chia khúc (trang) danh sách các record để user không rối khi dữ liệu quá nhiều
1. Cài đặt module ngx-pagination
Chạy lệnh sau trong folder project : npm install ngx-pagination
2. Nhúng module vào project
Mở file app.modules.ts và khai báo

3. Trong hàm lấy dữ liệu server: chỉ lấy 1 trang
Hàm lấy sản phẩm cần có điều chình :
- Thêm tham số pageNum – số trang cần lấy, pageSize – số record trong 1 trang.
- Request gửi lên server bổ sung thêm biến _page và _limit.
- Sử dụng {observe:’response’} khi request để lấy giá trị trong http header của response – trong đó có biến X-Total-Count
//du-lieu.service.ts
getSanPhamTheoLoai(idLoai:Number=0, pageSize:number=1, pageNum:number=1) {
  var url = `http://localhost:3000/sanpham?idLoai=${idLoai}&_sort=ngay&order=desc`;
  url+= `&_page=${pageNum}&_limit=${pageSize}`;
  return this.h.get<any>(url , {observe: 'response'} );
}
4. Trong component: Tạo các biến và các hàm dùng cho phân trang
- Khai báo các biến pageNum – trang hiện hành, pageSize – số record trong 1 trang, total – tổng số record
- Khi gọi hàm getSanPhamTheoLoai: truyền tham số pageSize, pageNum
- Khi nhận response : lấy res.body lưu vào listSanPham và lấy biến X-Total-Count trong header lưu vào total (do json -server trả về )
//san-pham-theo-loai.component.ts
...
export class SanPhamTheoLoaiComponent {
  listSanPham:ISanpham[]=[];  tenLoai:string="";  idLoai:number=0;
  pageNum:number=1;
  pageSize:number=2;
  total: number = 0;
...
this.d.getSanPhamTheoLoai(this.idLoai, this.pageSize,this.pageNum ).subscribe (
     res => {
        this.listSanPham  = res.body ;
        this.total = Number(res.headers.get('X-Total-Count'));
      }
);
- Trong component (sau hàm ngInit) định nghĩa hàm chuyển đến trang để khi user click chọn 1 page thì gán giá trị mới cho pageNum và request lại
chuyenDenTrang( p: number){
    this.pageNum = p;
     this.d.getSanPhamTheoLoai(this.idLoai, this.pageSize, this.pageNum).subscribe (
      res => {
        this.listSanPham  = res.body ;
        this.total = Number(res.headers.get('X-Total-Count'));
      }
     );
}
5. Giới hạn lặp và hiện các link phân trang
Mở file san-pham-theo-loai.component.html
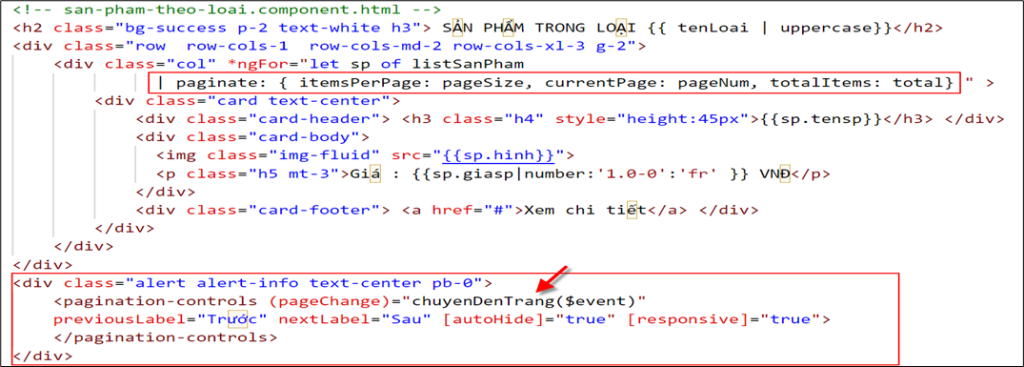
- Thêm lệnh paginate lúc lặp:
| paginate: { itemsPerPage: pageSize, currentPage: pageNum, totalItems: total}
- Cho hiện các link phân trang với lệnh
<pagination-controls (pageChange)="chuyenDenTrang($event)"
    previousLabel="Trước" nextLabel="Sau" [autoHide]="true" [responsive]="true">
</pagination-controls>

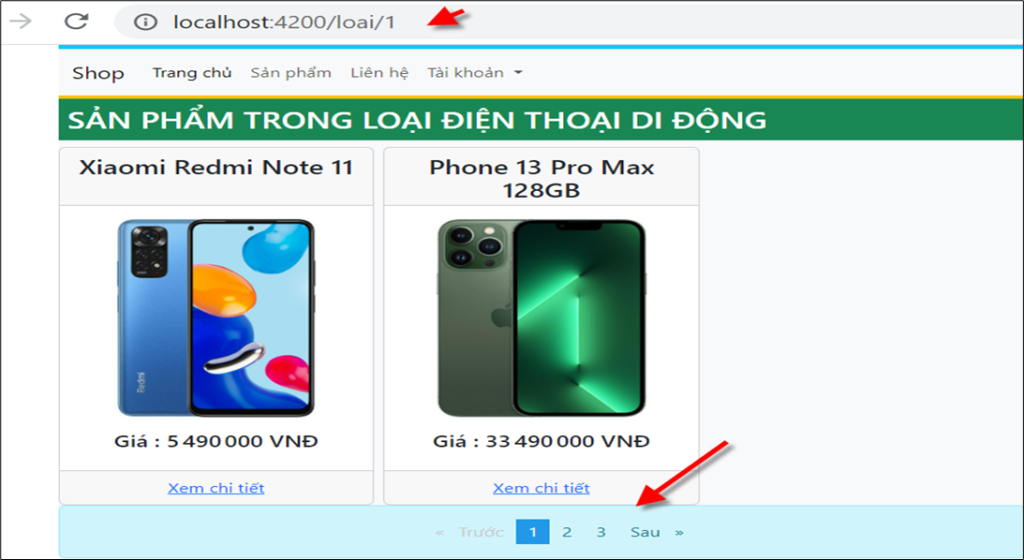
Test: Xem lại sẽ thấy thanh phân trang

Sau đây là các bài trong seris thực tập Angular bạn cần thực hiện tuần tự từ trên xuống để có project nhé:
- Đôi điều về Angular – P1
- Đôi điều về Angular – P2
- Hiện sản phẩm bán chạy
- Hiện sản phẩm mới dùng Angular
- Hiện loại sản phẩm dùng Angular
- Hiện sản phẩm theo loại dùng Angular
- Hiện chi tiết sản phẩm dùng Angular


