Lập trình MVC trong NodeJS hướng dẫn bạn cách thức phát triển website trong NodeJS với mô hình lập trình MVC.
Đôi điều về web Framework Express
Express là module rất phổ biến trong thế giới NodeJS, nó giúp web dev tạo nên các chức năng cơ bản cho project mà không phải thực hiện nhiều việc thủ công. Website của express là http://expressjs.com
Bạn nên cài đặt express ở chế độ global, để sử dụng nó cho việc tạo project ở máy local nhanh hơn. Ngoài express, module express-generator cũng hết sức cần thiết cài vào, vì nó giúp bạn phát sinh các file và folder cần dùng lúc bắt đầu project. Thực hiện cài đặt như sau:
- Mở command line
- Gõ lệnh npm install -g express
- Tiếp theo gõ lệnh npm -g install express-generator
1. Tạo project với express
Vào command line và chuyển đến folder chứa project rồi chạy lệnh:
express --view=ejs LabTest
Bạn sẽ thấy folder LabTest xuất hiện các folder và file trong đó

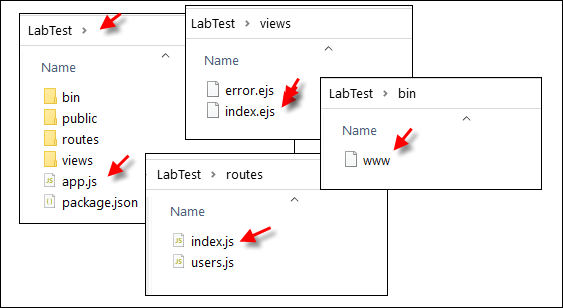
Trong folder project có file app.js , đây là file chính, giống file main trong C++. Express còn tạo 2 module routes/index và routes/users để xử lý các request HTTP. Hàm app.set() thường thấy trong code dùng để gán thông số cho project và các module. .
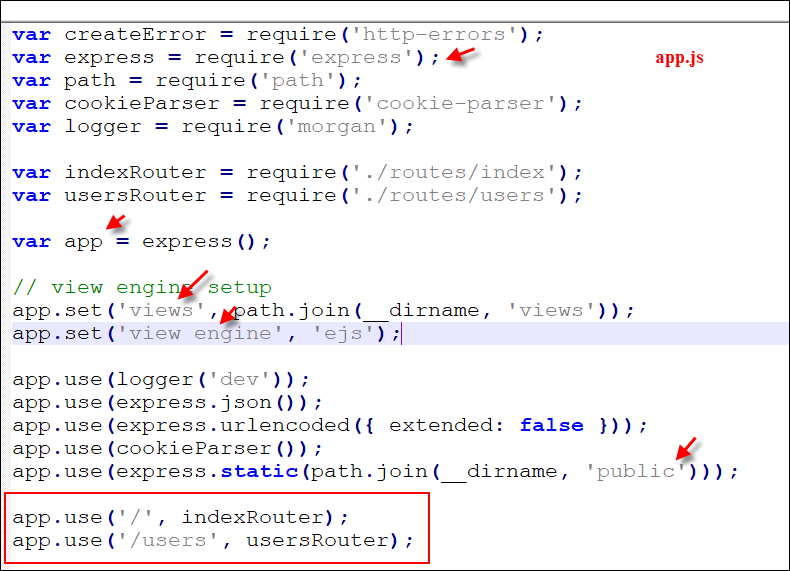
Như hình trên, bạn thấy các thư viện cần thiết đã được nhúng, đã set sẵn view engine cũng thiết lặp, folder views và folder public đã chỉ định. 3 controller indexRouter và usersRouter cũng đã được khai báo và chỉ định.
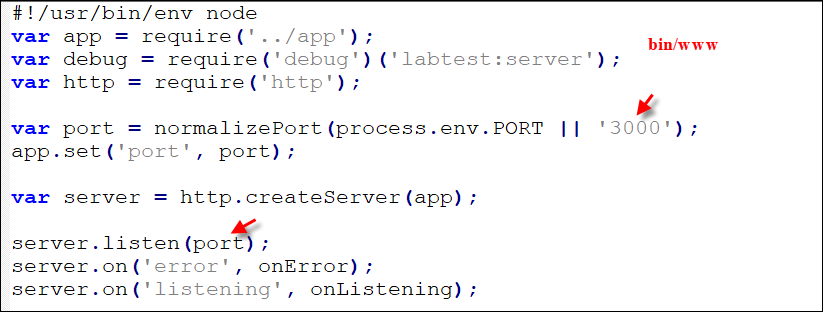
File www trong folder bin đã cũng đã listen sẵn ở port 3000 cho bạn.
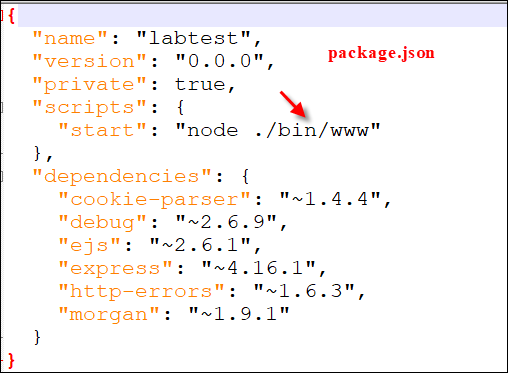
File package.json đã chỉ định start mặc định file bin/www
2. Cài module cho project
Express generator đã giúp tạo cấu trúc folder rất tốt nhưng project chưa có các module cần dùng. Tiếp theo bạn cài các module cơ bản để sử dụng. Bằng cách chuyển vào folder project rồi chạy lệnh : npm install
3. Chạy project
Giờ thì đã có cấu trúc folder cùng các module cơ bạn, chạy project thôi. Chạy 1 trong 2 lệnh npm start hoặc node bin/www. Sau đó xem trong rtrình duyệt http://localhost:3000

Mô hình MVC
MVC là mô hình thường được dùng hiện nay để phát triển các website. Vì MVC giúp tổ chức tách bạch giữa các thành phần quan trọng trong dự án: điều khiển (controller), xử lý dữ liệu (model) và hiển thị dữ liệu (view).


Controller trong mvc
Controller được tạo ra để thực thi các yêu cầu từ client. Controller thực hiện tiếp nhận tham số, gọi các hàm trong model, nạp các view cần thiết…
Model trong mvc
Model dùng để cung cấp dữ liệu, thực hiện kết nối, trích lọc, chèn, chỉnh sửa dữ liệu trong database, tương tác với file system, network.
View trong mvc
Mỗi view là một trang web hiển thị dữ liệu gì đó. Dữ liệu mà view hiển thị do controller cung cấp (controller lấy từ model để đưa cho view).
Việc tách riêng vai trò của Controller, Model và View giúp phân định rõ ràng các công việc xử lý nghiệp vụ, xử lý dữ liệu và trình bày dữ liệu. Do vậy việc cập nhật chỉnh sửa một thành phần không làm ảnh hưởng đến các thành phần khác. Dự án dể phát triển, bảo trì, cập nhật, phân chia công việc hơn.
Mô hình MVC trong Express
Lập trình MVC trong NodeJS tức bạn sẽ tạo nên các chức năng cho website theo quy ước của MVC. Theo đó, các việc xử lý request, hiển thị dữ liệu , xử lý dữ liệu phải tách bạch ra theo quy định.
Module express-generator giúp bạn tạo project đã gần giống với tổ chức MVC, như folder views chứa các file view để hiện dữ liệu, folder routes dùng để xử lý các đường path chính là thành phần controller trong MVC. Bạn cần tạo thêm thành phần model nữa để xử lý dữ liệu.
Để hiểu rõ lập trình MVC trong NodeJS là thế nào, chúng ta sẽ thực hiện một ví dụ nhé. Sau đây là phần hướng dẫn tạo controller, model, view để quản trị dữ liệu trong table có tên là loai .

Tạo controller trong nodejs
– Tạo file routes/loai.js
– Định nghĩa các route cho các action sẽ thực hiện list record, addnew, store, edit, update, delete
var express = require('express');
var router = express.Router();

router.get('/', function(req, res, next) {
    res.send('Danh sách loại');
});
router.get('/addnew', function(req, res, next) {
    res.send('Form thêm loại');
});
router.post('/store', function(req, res, next) {
    //nhận dữ liệu từ addnew để thêm record vào db
});
router.get('/edit/:id', function(req, res, next) {
  var id = req.params.id;
  res.send('Form chỉnh loại' + id);
});
router.post('/update', function(req, res, next) {
    //nhận dữ liệu từ edit để cập nhật vào db
});
router.get('/delete/:id', function(req, res) {
  var id = req.params.id;
  res.send('Xóa loai');
});

module.exports = router;
– Nhúng controller vào ứng dụng: Mở app.js và viết code để require controller loai.
var usersRouter = require('./routes/users');
var loaiRouter = require('./routes/loai');
– Khai báo đường dẫn cho controller: Trong file app.js , khai báo đường dẫn cho controller loại ở sau lệnh app.use(‘/users’, usersRouter);
app.use('/users', usersRouter);
app.use('/loai', loaiRouter);
Test các route, nếu thấy các chữ trong controller hiện ra là đúng.
http://localhost:3000/loai/
http://localhost:3000/loai/addnew
http://localhost:3000/loai/edit/1
http://localhost:3000/loai/delete/1

Tới đây đã tạo controller xong , bạn biết cách tạo controller ,tạo đường dẫn cho các chức năng rồi đó.
Tạo model
Thành phần model giúp tương tác với các hệ thống chứa dữ liệu.
– Mở command line, chuyển vào folder project
– Tạo folder tên models để chứa các model sẽ tạo
– Cài module mysql
– Tạo file models/database.js và code:
//Database trả về kết nối với cơ sở dữ liệu
var mysql = require('mysql');
var db = mysql.createConnection({
   host: 'localhost', user: 'root', password: '',
   database: 'labnodejs'
});
db.connect(() => console.log('Da ket noi database !'));
module.exports = db;
Nhúng model vào controller:
-Ở đầu controller loai, chèn model vào
var db=require('../models/database');
Chức năng hiện danh sách các record
– Code lại trong route / của controller loai để được như sau
router.get('/', function(req, res, next) {
    let sql = `SELECT * FROM loai`;
    db.query(sql, function(err, data) {
        res.render("loai_list",{list:data});
    });
});
– Tạo view: Tạo file views/loai_list.ejs để hiển thị các record lấy được từ db
<link href="https://cdn.jsdelivr.net/npm/bootstrap@5.3.3/dist/css/bootstrap.min.css" rel= "stylesheet">
<table class="table table-bordered w-75 m-auto">
 <tr><th>id</th><th>Tên loại</th><th>Thứ tự</th><th>Ẩn hiện</th> </tr>
  <% for (let c of list ) {  %>
  <tr> <td> <%= c.id %> </td>
       <td> <%= c.tenLoai %> </td>
       <td> <%= c.thuTu %> </td>
       <td> <%= c.anHien==1 ? "Đang hiện":"Đang ẩn"%></td>
  </tr>
  <% } %>
</table>
– Test: http://localhost:3000/loai/
Chức năng thêm mới
– Code lại trong route addnew của controller loai để được như sau
router.get('/addnew', function(req, res, next) {
    //res.send('Form thêm loại sách');
    res.render("loai_addnew");
});
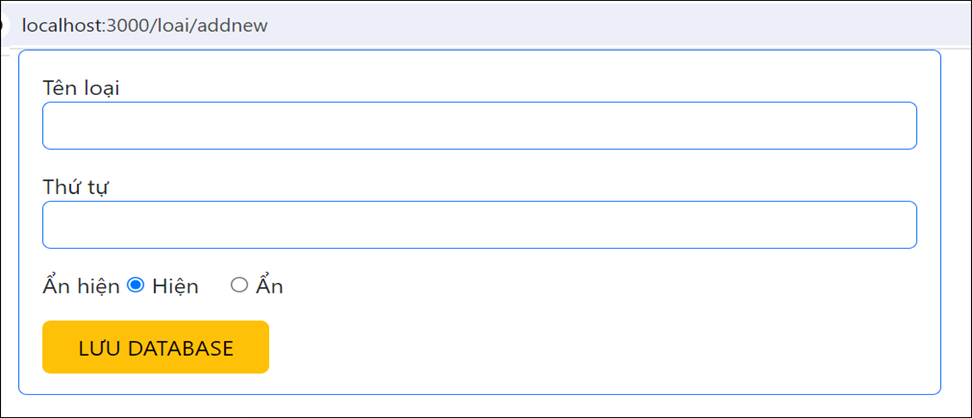
– Tạo view: Tạo file views/loai_addnew.ejs và code
<link href= "https://cdn.jsdelivr.net/npm/bootstrap@5.3.3/dist/css/bootstrap.min.css" rel="stylesheet">
<form class="col-6 border border-primary p-3 m-auto" action= "/loai/store" method="POST">
  <div class="mb-3">Tên loại
     <input class="form-control border-primary" name="tenLoai">
  </div>
  <div class="mb-3">Thứ tự
     <input class="form-control border-primary" name="thuTu">
  </div>
  <div class="mb-3"> Ẩn hiện
      <input type="radio" name="anHien" value="1" checked> Hiện
      <input type="radio" name="anHien" value="0">Ẩn
  </div>
  <div class="mt-3">
     <button type="submit" class="btn btn-warning p-4 py-2">
      LƯU DATABASE
     </button>
  </div>
</form>
– Test: http://localhost:3000/loai/addnew
Lưu form vào database: Code lại route store của controller loai để được như sau
router.post('/store', function(req, res, next) {
  let tl = req.body.tenLoai;
  let t = req.body.thuTu;
  let ah = req.body.anHien;
  let loai = { tenLoai:tl, thuTu:t, anHien:ah}
  db.query('insert into loai SET ?', loai, function(err, data) {
      if (err) throw err;
      res.redirect("/loai/");
  });
});
Test : submit form addnew , dữ liệu mới phải có trong database
Chức năng hiệu chỉnh

– Code lại trong route edit của controller loai để được như sau
router.get('/edit/:id', function(req, res, next) {
  let id = req.params.id;
  let sql = `SELECT id, tenLoai, thuTu, anHien FROM loai where id=${id}`;
  db.query(sql, function(err, data) {
    res.render("loai_edit", { loai:data[0]});
  });
});
– Copy file loai_addnew thành loai_edit.ejs và thực hiện chỉnh như sau

– Thêm code sau vào trong form (chỗ nào cũng được) để giữ id của loại cần cập nhật, sẽ dùng khi lưu database
<input type="hidden" name="id" value="<%=loai.id%>">– Test: nhập được dẫn edit với các id khác nhau sẽ hiện thông tin của loại trong form
– Cập nhật record vào database: Code lại trong route update của controller loai để được như sau
router.post('/update/', function(req, res, next) {
  //nhận dữ liệu từ edit để cập nhật vào db
  let id = req.body.id;
  let tl = req.body.tenLoai;
  let t = req.body.thuTu;
  let ah = req.body.anHien;
  db.query(`UPDATE loai SET tenLoai=?,thuTu=?, anHien=? WHERE id = ?`,  [tl, t,ah, id],
     function(err, data) {
      if (data.affectedRows==0) {
         console.log(`Không có id loại ${id} để cập nhật`);
      }
      res.redirect("/loai/");
 })
});
– Test: nhập giá trị mới trong form và lưu, sẽ thấy tác dụng
Chức năng xóa 1 record
– Code lại trong route delete của controller loai để được như sau
router.get('/delete/:id', function(req, res) {
  let id = req.params.id;
  let sql= `DELETE FROM loai WHERE id = ?`;
  db.query(sql, [id], function(err, data) {
    if (data.affectedRows==0) {
        console.log(`Không có loại ${id} để xóa`);
    }
    res.redirect('/loai');
  })
});
Test: nhập đường dẫn delete với các id thích hợp (ví dụ http://localhost:3000/loai/delete/9) sẽ thấy loại bị xóa
Lập trình MVC trong NodeJS giúp bạn thực hiện công việc theo khuôn mẫu, nhờ đó làm nhanh hơn, sự tách bạch các thành phần giúp dễ dò lỗi, dễ chia việc trong team… bài cần phải có kiến thức kết nối database trong NodeJS, bạn cần đọc bài Làm việc với mysql trong NodeJS trước đã nhé
Bài tập: thực hiện luyện tập mvc tương tự như trên nhưng với table sach như sau:


