Migration và seeder trong sequelize rất cần thiết cho team dự án. Nó giúp tạo chỉnh, xóa table và dữ liệu trong các table rất nhanh chóng.
Giới thiệu migration trong sequelize
Migration trong sequelize giúp bạn tạo nhanh các table, chỉnh sửa cấu trúc table, thiết lập quan hệ giữa các table trong database… Công cụ này rất hữu ích để tạo, chỉnh các table trong quá trình phát triển dự án, càng quan trọng hơn khi team có nhiều người.
Bạn sẽ tạo nhiều file migration. Mỗi file migration được tạo ra để tạo, chỉnh 1 table nào đó, trong mỗi file này có hai hàm up và down. 1 trong 2 hàm này sẽ thực thi khi bạn chạy migrgation hoặc undo migration.
Cài đặt sequelize-cli
– Để sử dụng mirgration, bạn cần cài đặt sequelize và sequelize-cli vào dự án. lệnh như sau:
npm install sequelize sequelize-cli– Tiếp theo , muốn làm việc với hệ quản trị datable nào thì cài thêm driver của hệ quản trị đó
npm install pg pg-hstore  # Postgres
npm install mysql2    # mysql
npm install sqlite3   # sqlite
npm install tedious   # Microsoft SQL Server
npm install oracledb  # Oracle Database
Khởi tạo dự án
Để bắt đầu, bạn tạo project bằng cách tạo 1 folder trống rồi chạy lệnh sau để khởi tạo
npx sequelize-cli initLệnh trên chạy xong sẽ tạo các folder như sau :
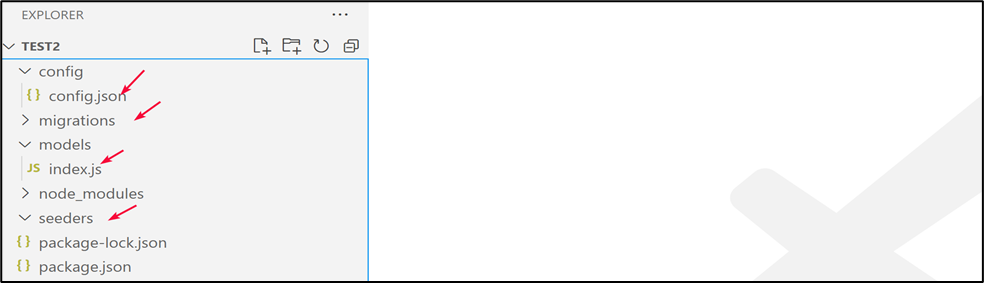
- folder config chứa các file cấu hình (như thông số kết nối database) để sequelize-cli hoạt động
- folder models: chứa các model tương tác các table trong project
- folder migrations: chứa các file migration để tạo , sử, xóa các table
- folder seeders: chứa các file dùng để chèn data vào các table
Cấu hình kết nối database
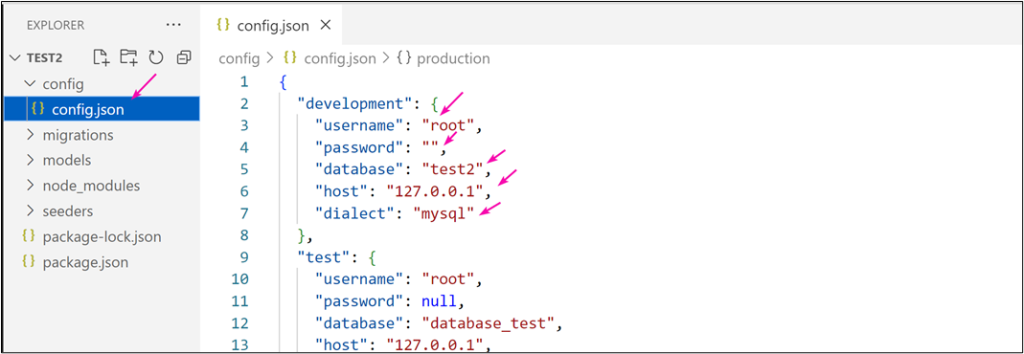
Cấu hình kết nối database là cấu hình quan trọng nhất , bạn khai báo trong file config.json trong folder config. It looks something like this:
{
  "development": {
    "username": "root",
    "password": null,
    "database": "database_development",
    "host": "127.0.0.1",
    "dialect": "mysql"
  },
  "production": {
    "username": "root",
    "password": null,
    "database": "database_production",
    "host": "127.0.0.1",
    "dialect": "mysql"
  }
}
Thực tập dùng mirgration tạo table với sequelize
Phần trên chỉ là giới thiệu , còn bây giờ thì chúng ta bắt đầu thực tập nhé.
Tạo project và cài các module
1. Mời bạn tạo foder project trống (ví dụ test2) rồi chuyển vào folder mới tạo

2. Cài gói sequelize và sequelize-cli: Trong folder project chạy lệnh sau để cài 2 gói
npm install sequelize sequelize-cli
3. Cài thêm module mysql2 để sequelize tương tác với mysql :
npm install mysql2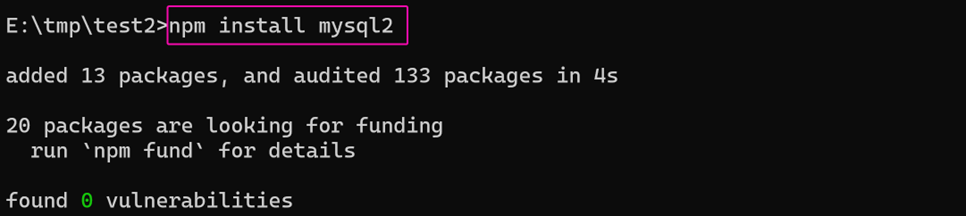
4. Khởi tạo cấu hình: Trong folder project chạy lệnh sau để tạo cấu hình cần cho sequelize hoạt động:
npx sequelize-cli init
Lệnh trên sẽ tạo các file và folder như trong hình sau:
5. Cấu hình database
– Tạo 1 database tên gì đó (ví dụ test2) để thực tập
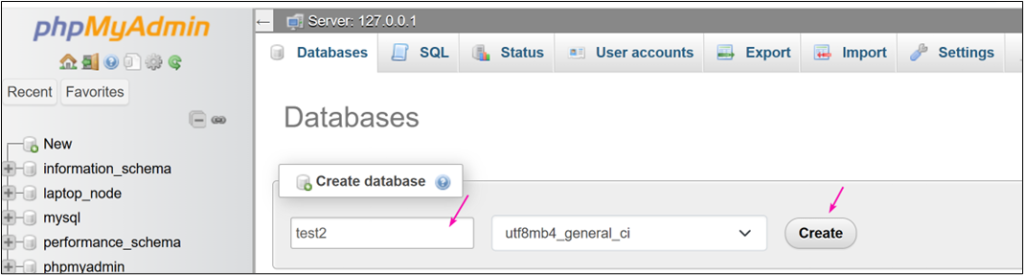
– Mở file config/config.json và cấu hình tên database, và username password cho đúng.
Tạo các migration
Trong folder project, chạy các lệnh sau để tạo migration cho 3 bảng loai , san_pham và users:
npx sequelize-cli model:generate --name loai --attributes  ten_loai:string
npx sequelize-cli model:generate --name san_pham --attributes ten_sp:string
npx sequelize-cli model:generate --name user --attributes email:string
Trong đó trong –name là tên , và các field khai báo trong –attributes, tạm thời chỉ khai báo 1 field trong table, không cần khai báo hết, chút nữa bổ sung thêm.
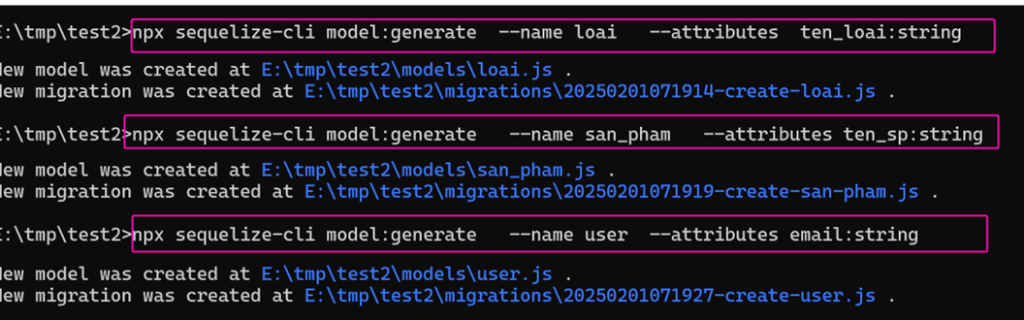
Mỗi lệnh như trên sẽ tạo ra 1 file trong folder migrations và 1 file trong folder models, tên mỗi file migration bắt đầu bằng thời điểm tạo ra file, và đây chính là các file chúng ta dùng

Khai báo cấu trúc các bảng
Mở 1 file migration, bạn sẽ thấy trong đây có 2 hàm, hàm up để tạo table, hàm down để xóa table. Tên table bạn cần khai báo đúng trong 2 hàm này (trong lệnh createTable và dropTable)
Trong hàm createTable, khai báo các field cho table, trong đó đã có sẵn 4 field là id (khóa chính), field createAt , updateAt, và field đã khai báo lúc tạo migration ở bước trên.. Mỗi field có kiểu dữ liệu và nhiều thuộc tính. Bạn thay đổi , bổ sung các thuộc tính tùy nhu cầu (unique là duy nhất, primaryKey là khóa chính, defaultValue là giá trị mặc định, allowNull: cho phép null…)
Ngoài 4 field đã có, bạn tùy ý khai báo thêm các field khác để có được các field đầy đủ của table.
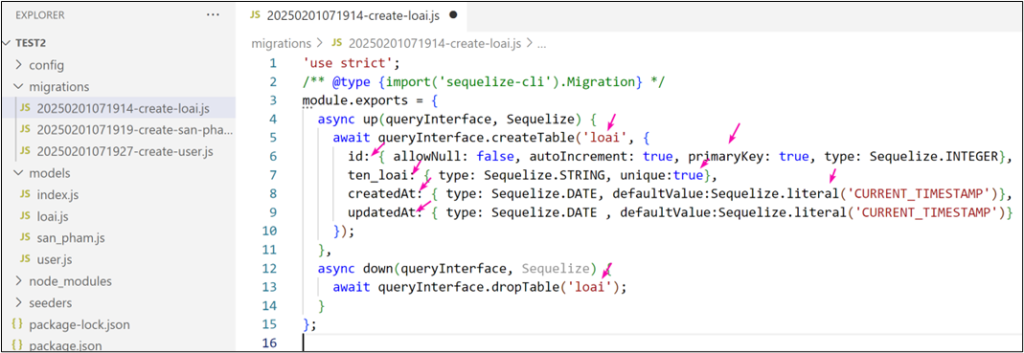
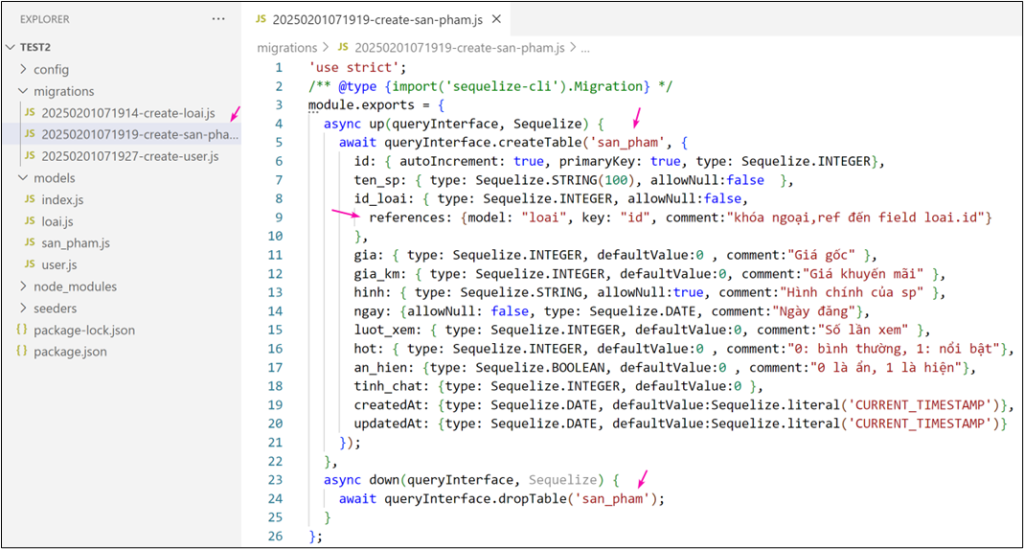
Gợi ý khai báo bảng loai như sau
'use strict';
/** @type {import('sequelize-cli').Migration} */
module.exports = {
async up(queryInterface, Sequelize) {
await queryInterface.createTable('loai', {
id: {
allowNull: false, autoIncrement: true,
primaryKey: true, type: Sequelize.INTEGER},
ten_loai: {
type: Sequelize.STRING, unique:true},
thu_tu: {
type: Sequelize.INTEGER, defaultValue:0 },
an_hien: {
type: Sequelize.BOOLEAN, defaultValue:0 },
createdAt: {
type: Sequelize.DATE,
defaultValue:Sequelize.literal('CURRENT_TIMESTAMP')},
updatedAt: {
type: Sequelize.DATE ,
defaultValue:Sequelize.literal('CURRENT_TIMESTAMP')}
});
},
async down(queryInterface, Sequelize) {
await queryInterface.dropTable('loai');
}
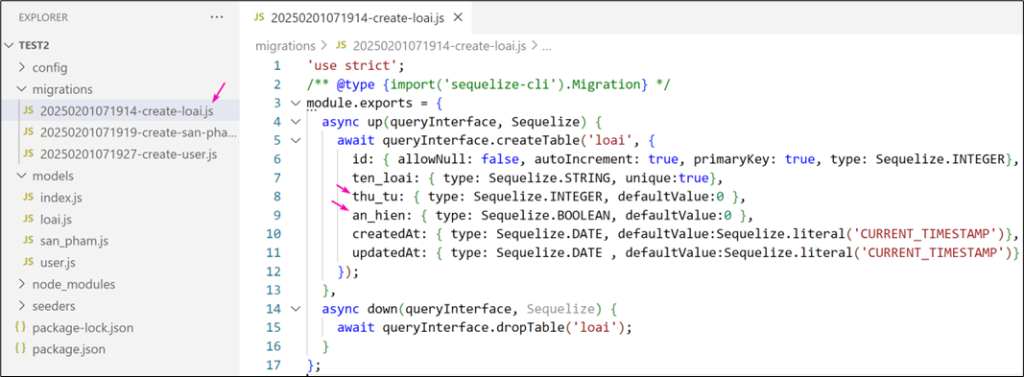
};Gợi ý khai báo cấu trúc bảng san_pham như sau
'use strict';
/** @type {import('sequelize-cli').Migration} */
module.exports = {
  async up(queryInterface, Sequelize) {
    await queryInterface.createTable('san_pham', {
      id: {
         autoIncrement: true, primaryKey: true,
         type: Sequelize.INTEGER},
      ten_sp: {
         type: Sequelize.STRING(100),
         allowNull:false  },
      id_loai: {
         type: Sequelize.INTEGER,
         allowNull:false,
        references: {
           model: "loai",
           key: "id",
           comment:"khóa ngoại,ref đến field loai.id" }
      },
      gia: {
         type: Sequelize.INTEGER,
         defaultValue:0 , comment:"Giá gốc" },
      gia_km: {
         type: Sequelize.INTEGER,
         defaultValue:0,
         comment:"Giá khuyến mãi" },
      hinh: {
         type: Sequelize.STRING,
         allowNull:true,
         comment:"Hình chính của sp" },
      ngay: {
         allowNull: false,
         type: Sequelize.DATE, comment:"Ngày đăng"},
      luot_xem: {
          type: Sequelize.INTEGER, defaultValue:0,
          comment:"Số lần xem" },
      hot: {
          type: Sequelize.INTEGER, defaultValue:0 ,
          comment:"0: bình thường, 1: nổi bật"},
      an_hien: {
          type: Sequelize.BOOLEAN, defaultValue:0 ,
          comment:"0 là ẩn, 1 là hiện"},
      tinh_chat: {
          type: Sequelize.INTEGER,
          defaultValue:0 },
      createdAt: {
          type: Sequelize.DATE,
          defaultValue:Sequelize.literal('CURRENT_TIMESTAMP')},
      updatedAt: {
          type: Sequelize.DATE,
          defaultValue:Sequelize.literal('CURRENT_TIMESTAMP')}
    });
  },
  async down(queryInterface, Sequelize) {
    await queryInterface.dropTable('san_pham');
  }
};
Gợi ý khai báo cấu trúc bảng users như sau
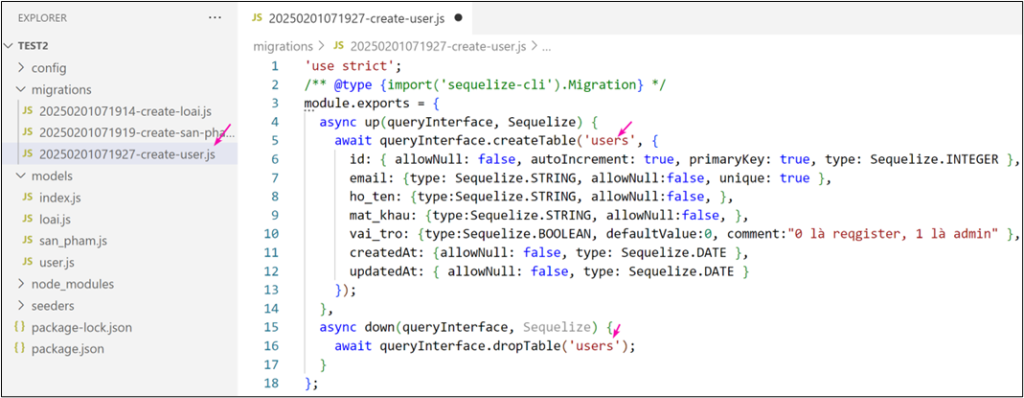
'use strict';
/** @type {import('sequelize-cli').Migration} */
module.exports = {
  async up(queryInterface, Sequelize) {
    await queryInterface.createTable('users', {
      id: {
         allowNull: false, autoIncrement: true,
         primaryKey: true, type: Sequelize.INTEGER },
      email: {
         type: Sequelize.STRING,
         allowNull:false, unique: true },
      ho_ten: {
          type:Sequelize.STRING, allowNull:false, },
      mat_khau: {
          type:Sequelize.STRING, allowNull:false, },
      vai_tro: {
          type:Sequelize.BOOLEAN, defaultValue:0,
          comment:"0 là reqgister, 1 là admin" },
      createdAt: {
          allowNull: false, type: Sequelize.DATE },
      updatedAt: {
          allowNull: false, type: Sequelize.DATE }
    });
  },
  async down(queryInterface, Sequelize) {
    await queryInterface.dropTable('users');
  }
};
Chạy migration
Trong folder project , chạy lệnh npx sequelize-cli db:migrate
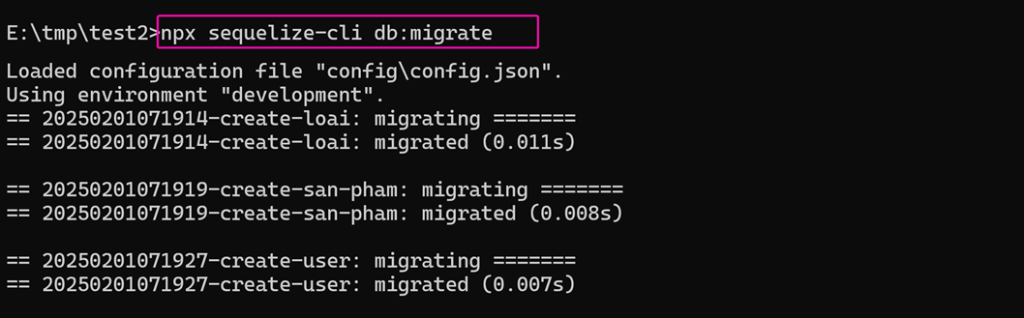
3 file mirgation đã tạo sẽ chạy và tạo thành 3 table trong database. Table users được tạo như sau, các thuộc tính của từng field được tạo đúng như khai báo
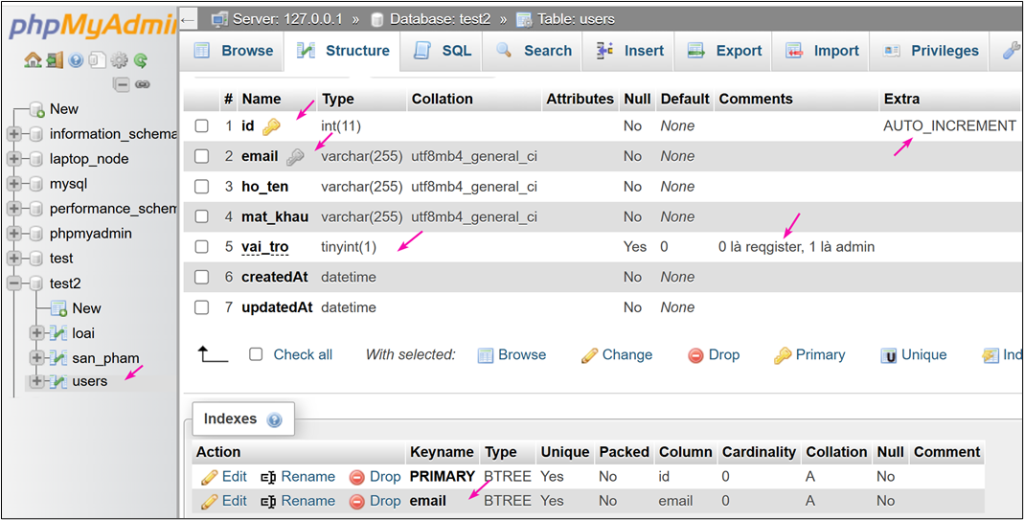
Table loai được tạo như sau
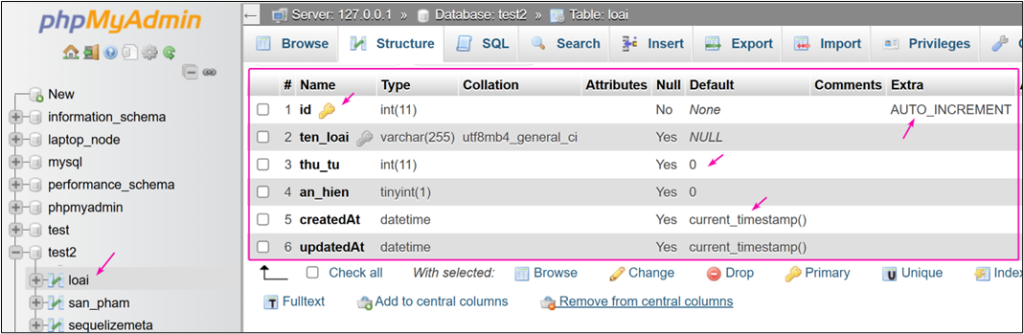
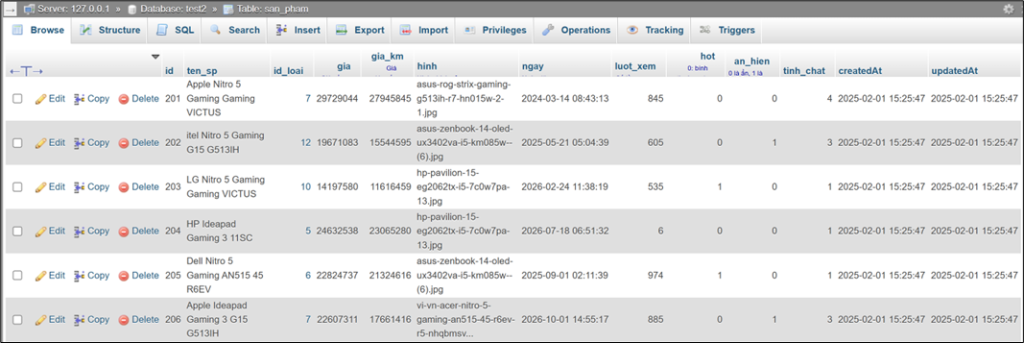
Table san_pham cũng được tạo như khai báo.
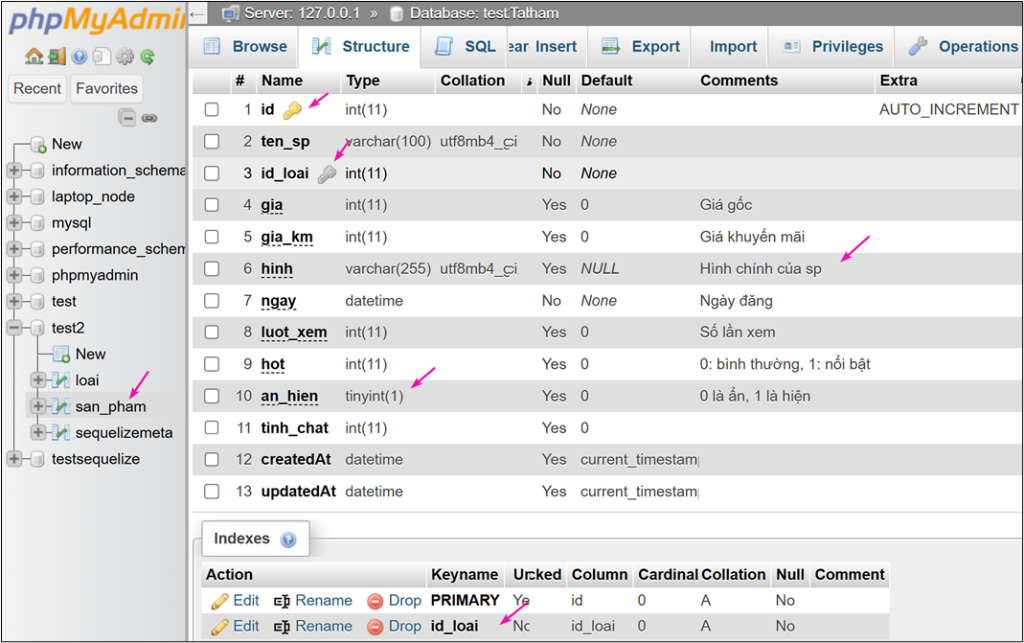
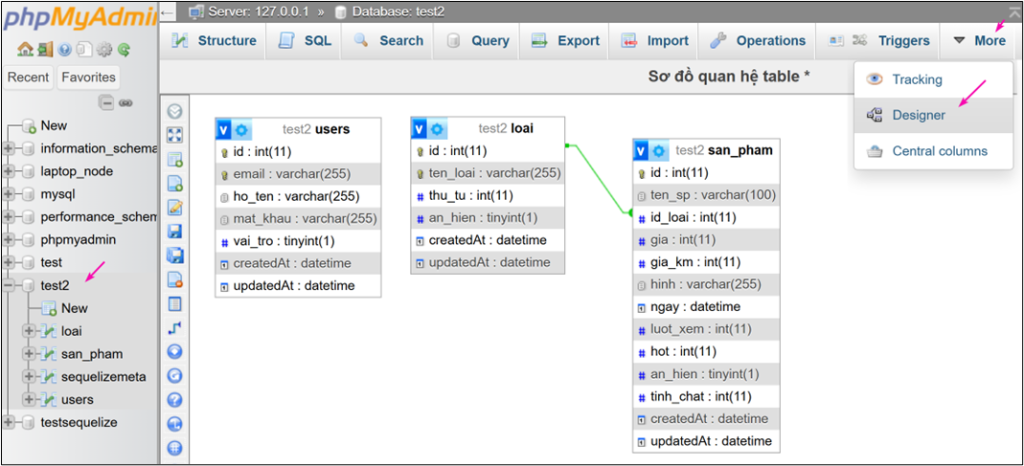
Riêng field id_loai được tạo index và thiết lập quan hệ với field id của bảng loại. Nhắp tên database rồi chọn Designer bạn sẽ thấy quan hệ được thiết lập giữa bảng loai và san_pham luôn. Khoái chưa 😊
Undo migration
Khi chạy lệnh npx sequelize-cli db:migrate thì các table sẽ được tạo ra. Thế khi muốn hủy bỏ chức năng tạo table thì sao? Bạn chỉ việc chạy lệnh sau:
npx sequelize-cli db:migrate:undo  => hủy bỏ kết quả của migration cuối
npx sequelize-cli db:migrate:undo:all   => hủy bỏ kết quả của tất cả các migration
Như vậy, sau khi khai báo migration, Bạn chỉ cần 1 dòng lệnh là các table được tạo ra trong databse. Thực hiện xong thì gửi đến cho team, các member cũng chỉ 1 dòng lệnh là có đủ các table. Trong quá trình làm dự án, khi cần thêm bớt field, chỉnh tên field, hay thêm bớt , chỉnh tên, chỉnh thuộc tính các table chỉ việc khai báo trong các file migration rồi chạy lại 1 lệnh là xong.
Thực tập dùng seeder để chèn dữ liệu vào table
Hai tính năng migration và seeder trong sequelize rất hay. Ở trên Bạn đã trải nghiệm migration rồi đó, giờ thì đến seeder.
Seed trong sequelize là gì
Seed trong sequelize giúp chèn nhiều dữ liệu vào trong các table một cách nhanh chóng mà không thực hiện thủ công mất thời gian qua giao diện của các tool quản trị như phpMyAdmin, Workbench. Việc dùng seeder để chèn data vào các table là rất cần thiết khi dự án bắt đầu vào giai đoạn code. Vì cần phải có dữ liệu để show ra trang web, để test các chức năng quản trị. Dữ liệu này có thể được xóa sửa và thêm lại nhiều lần trong quá trình phát triển của dự án.
Tạo file seeder
Các file seeder sẽ được tạo bằng lệnh npx sequelize-cli seed:generate . Mời xem ví dụ sau là 3 lệnh tạo seeder để chèn vào các table loai, san_pham, users
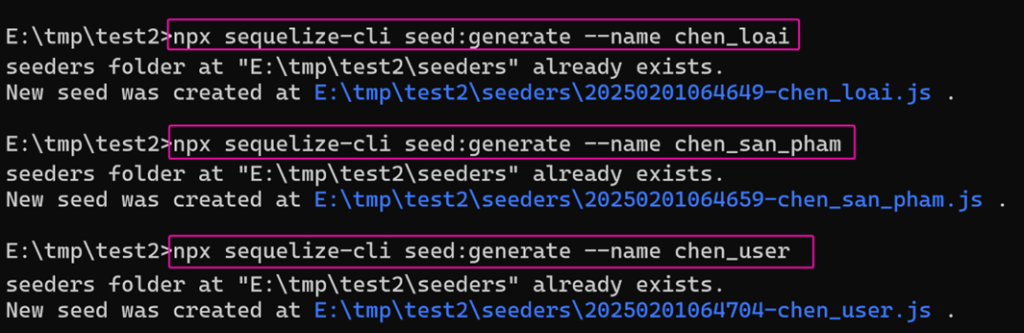
npx sequelize-cli seed:generate --name chen_loai
npx sequelize-cli seed:generate --name chen_san_pham
npx sequelize-cli seed:generate --name chen_user
Mỗi lệnh trên khi chạy sẽ tạo 1 file seed có 2 hàm up và down, trong hàm này bạn code để chèn , xóa dữ liệu trong các table
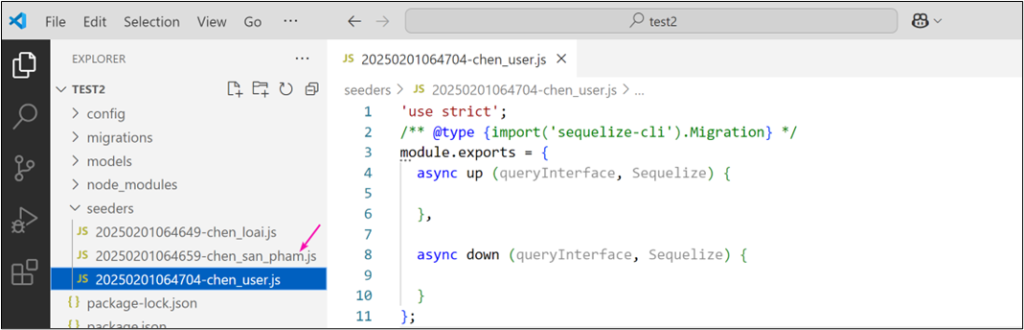
Code file seed chèn dữ liệu users
– Cài module bscyptjs bằng lệnh : npm install bcryptjs
– Mở file xxx- chen_user.js và xóa hết code lại:
'use strict';
/** @type {import('sequelize-cli').Migration} */
const bc = require("bcryptjs");
module.exports = {
  async up (queryInterface, Sequelize) {
      const user_arr = [
        { ht:"Đỗ Đạt Cao",
          email:"dodatcao@gmail.com",
          pass:"hehe", vai_tro:1} ,
        { ht:"Đào Kho Báu",
          email:"daokhobau@gmail.com",
          pass:"hehe", vai_tro:0} ,
        { ht:"Đào Được Vàng",
          email:"daoduocvang@gmail.com",
          pass:"hehe", vai_tro:0} ,
      ];
      for (let i=0; i< user_arr.length; i++) {
          let  row = user_arr[i];
          await queryInterface.bulkInsert('users', [{
            email: row.ht,
            mat_khau: await bc.hash(row.pass, bc.genSaltSync(8)),
            vai_tro:row.vai_tro
          }], {} );
    }//for
  },
  async down (queryInterface, Sequelize) {
      await queryInterface.bulkDelete('users', null, {});
  }
};
Code file seed chèn dữ liệu loại
Mở file xxx- chen_loai.js và xóa hết code lại:
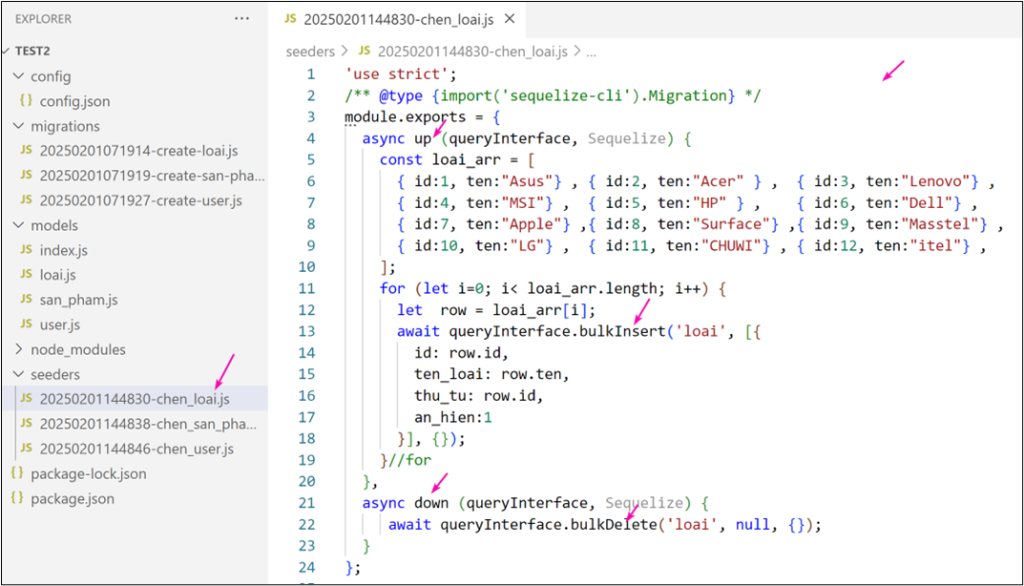
'use strict';
/** @type {import('sequelize-cli').Migration} */
module.exports = {
  async up (queryInterface, Sequelize) {
    const loai_arr = [
      { id:1, ten:"Asus"} ,
      { id:2, ten:"Acer"} ,
      { id:3, ten:"Lenovo"} ,
      { id:4, ten:"MSI"} ,
      { id:5, ten:"HP"} ,
      { id:6, ten:"Dell"} ,
      { id:7, ten:"Apple"} ,
      { id:8, ten:"Surface"} ,
      { id:9, ten:"Masstel"} ,
      { id:10, ten:"LG"} ,
      { id:11, ten:"CHUWI"} ,
      { id:12, ten:"itel"} ,
    ];
    for (let i=0; i< loai_arr.length; i++) {
      let  row = loai_arr[i];
      await queryInterface.bulkInsert('loai', [{
        id: row.id,
        ten_loai: row.ten,
        thu_tu: row.id,
        an_hien:1
      }], {});
    }//for
  },
  async down (queryInterface, Sequelize) {
     await queryInterface.bulkDelete('loai', null, {});
  }
};
Code file seed chèn dữ liệu loại
Mở file xxx- chen_san_pham.js và xóa hết code lại:
'use strict';
/** @type {import('sequelize-cli').Migration} */
module.exports = {
  async up (queryInterface, Sequelize) {
    const loai_arr = [
      { id:1, ten:"Asus"} , { id:2, ten:"Acer"} ,
      { id:3, ten:"Lenovo"},{ id:4, ten:"MSI"} ,
      { id:5, ten:"HP"} ,   { id:6, ten:"Dell"} ,
      { id:7, ten:"Apple"} ,{ id:8, ten:"Surface"} ,
      { id:9, ten:"Masstel"} , { id:10, ten:"LG"} ,
      { id:11, ten:"CHUWI"} ,  { id:12, ten:"itel"} ,
    ];
    const lt1_arr = [
      'Gaming ROG Strix','Nitro 5 Gaming','Ideapad Gaming 3'];
    const lt2_arr = [
      'G15 G513IH','AN515 45 R6EV','15IHU6','11SC','Gaming VICTUS'];
    const hinh_arr =[
      'asus-rog-strix-gaming-g513ih-r7-hn015w-2-1.jpg',
      'vi-vn-acer-nitro-5-gaming-an515-45-r6ev-r5-nhqbmsv006-4.jpg',
      'hp-pavilion-15-eg2062tx-i5-7c0w7pa-13.jpg',
      'victus-15-fa0111tx-i5-7c0r4pa-glr-1.jpg',
      'asus-zenbook-14-oled-ux3402va-i5-km085w--(6).jpg',
      'macbook-pro-13-inch-m2-2022-231122-041529.jpg',
      'masstel-e140-n4120-glr-2.jpg'
    ];
   for (let i=1; i<=200; i++){
     let gi =Math.floor(5000000+Math.random()*(30000000 - 5000000 + 1))
     let giam=Math.floor(1000000+Math.random()*(5000000 - 1000000 + 1));
     let gia_km = gia - giam;
     const loai=loai_arr[ Math.floor(Math.random() * loai_arr.length) ];
     let id_loai = loai.id;
     let ten_loai = loai.ten;
     let lt1_random=lt1_arr[Math.floor(Math.random() * lt1_arr.length) ]
     let lt2_random=lt2_arr[Math.floor(Math.random() * lt2_arr.length) ]
     let ten_sp = `${ten_loai} ${lt1_random} ${lt2_random}`
     let hinh = hinh_arr[ Math.floor(Math.random() * hinh_arr.length) ]
     let nam = Math.floor(2024 + Math.random()*(2026 - 2024 + 1))
     let thang = Math.floor(1 + Math.random()*(12 - 1 + 1))
     let ngay = Math.floor(1 + Math.random()*(28 - 1 + 1))
     let gio = Math.floor(1 + Math.random()*(23 - 1 + 1))
     let phut = Math.floor(1 + Math.random()*(60 - 1 + 1))
     let giay = Math.floor(1 + Math.random()*(60 - 1 + 1))
     let randtime = `${nam}-${thang}-${ngay} ${gio}:${phut}:${giay}`;
     const hot_arr = [0,1,2,3,4,5,6,7,8,9,10]
     let hot = hot_arr[ Math.floor(Math.random() * hot_arr.length) ] % 3 ==0 ? 1:0;
     const an_hien_arr = [0,1,5,35,3,67,49,5,61,7,19,9,10]
     let an_hien = an_hien_arr[ Math.floor(Math.random() * an_hien_arr.length) ] % 3 ==0? 1:0;
     let luot_xem = Math.floor(0 + Math.random()*(1000 - 0 + 1))
     let tinh_chat = 1 ;// 1 bthường, 2 giá rẻ, 3 giảm sốc, 4 cao cấp
     if (gia>=28000000) tinh_chat = 4;  //cao cấp
     else if (gia - gia_km >=3000000) tinh_chat = 3; //giảm sốc
     else if (gia <= 6000000) tinh_chat = 2;//giá rẻ
     else tinh_chat = 1;  //Bình thường
     let [id_sp, kq ]= await queryInterface.insert(null, 'san_pham', {
       ten_sp: ten_sp,
       gia: gia,
       gia_km:gia_km,
       hinh: hinh ,
       id_loai: id_loai,
       hot:  hot,
       ngay: randtime ,
       luot_xem:  luot_xem,
       tinh_chat:tinh_chat,
       an_hien: an_hien,
      }, {} );
    }//for
  },
  async down (queryInterface, Sequelize) {
     await queryInterface.bulkDelete('san_pham', null, {});
  }
};
Chạy các file seed
npx sequelize-cli db:seed:all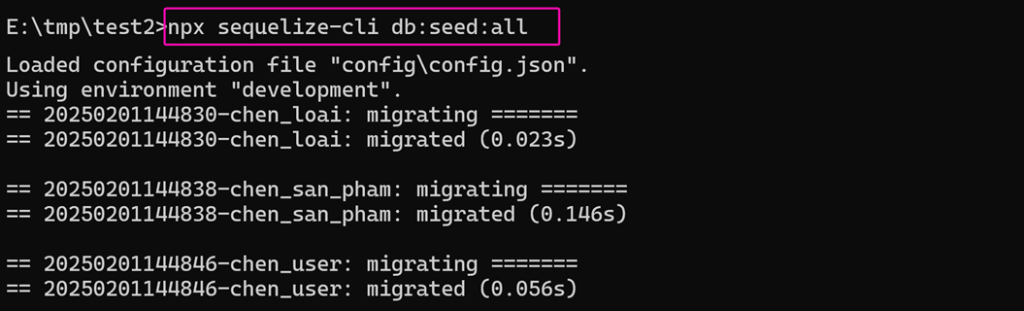
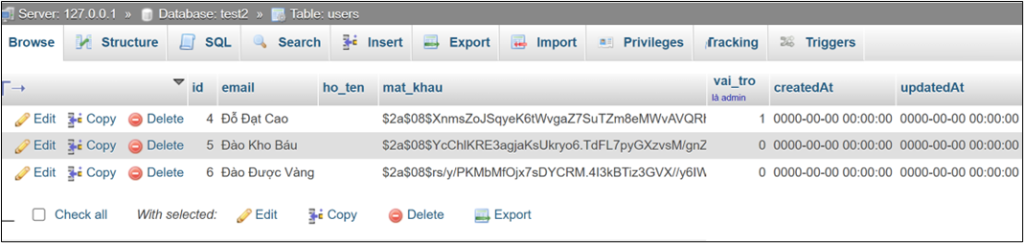
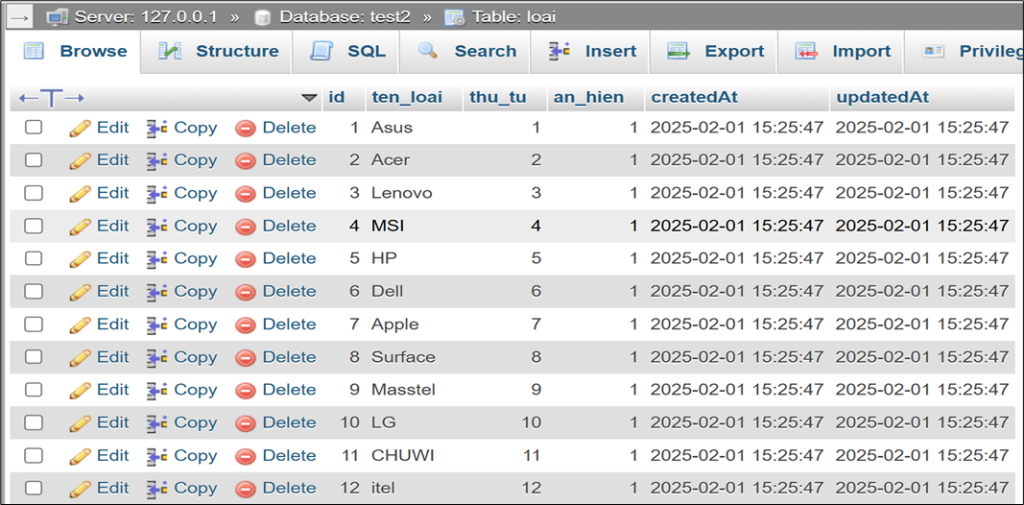
Kết quả chạy trong database sẽ có dữ liệu
Undo seed
npx sequelize-cli db:seed:undo:all

