Sử dụng Sequelize trong NodeJS để tương tác với database. Bạn không cần viết câu lệnh sql nào mà vẫn dễ dàng quản trị dữ liệu trong các table.
Giới Thiệu về Sequelize
Sequelize là một thư viện hay trong NodeJS, nó giúp làm việc với cơ sở dữ liệu dễ dàng mà không cần phải viết thủ công các lệnh SQL. Sequelize có nhiều tính năng, sau đây là liệt kê một vài tính năng để bạn biết qua trước:
Tương tác với nhiều hệ quản trị dữ liệu : Sequelize cho phép tương tác với nhiều hệ quản trị cơ sở dữ liệu như MySQL, PostgreSQL, MSSQL. Khi sử dụng Sequelize, không cần viết các câu lệnh SQL mà thay vào đó là dùng các đối tượng JavaScript. Đặc điểm này của Sequelize gọi là ORM ((Object-Relational Mapping) giúp code dễ viết code, dễ đọc hơn.
Validate : Sequelize hỗ trợ kiểm tra dữ liệu trước khi lưu vào database
Association : Sequelize hỗ trợ diễn tả quan hệ giữa các table với các method như hasMany, belongsTo, belongsToMany, v.v.
Migration : đây là chức năng quản lý cấu trúc table trong database rất hay .
Seeders: đây là chức năng tuyệt vời giúp chèn nhiều vào các table một cách nhanh chóng .
Tài liệu hướng dẫn cài đặt và sử dụng ở đây https://sequelize.org/docs/v6/getting-started/
Các thao tác cơ bản khi dùng Sequelize
Cài đặt sequelize
Để sử dụng Sequelize trong NodeJS, bạn cài đặt bằng lệnh : npm install sequelize . Sau khi cài xong, bạn cần cài thêm driver liên quan đến cơ sở dữ liệu muốn dùng (như mysql, postgresql, sqlite, mssql ). Mời xem các ví dụ
npm install pg pg-hstore # Postgres
npm install mysql2       # Mysql
npm install sqlite3      # sqlite
npm install tedious     # Microsoft SQL Server
npm install oracledb    # Oracle Database
Khai báo thông số kết nối database cho sequelize
Bạn cần thực hiện kết nối đến database rồi sau đó muốn làm gì thì làm. Đây là ví dụ kết nối với MySQL:
const { Sequelize, DataTypes } = require('sequelize');
const sequelize = new Sequelize('db_name', 'db_user', 'db_pass' , {
  host: 'localhost',
  dialect: 'mysql' /* mysql, postgres, sqlite, mssql, oracle */
});
Tạo model mô tả các table trong sequelize
Trong Sequelize, tương tác với database thông qua các model. Model giống như một class để mô tả dữ liệu trong table. Thông qua model trong Sequelize , bạn có thể select, tạo mới, cập nhật, xóa các dòng dữ liệu trong table rất dễ dàng. Ví dụ sau là model mô tả bảng san_pham:
const SP  = sequelize.define('san_pham', {
    ten_sp: {type: DataTypes.STRING },
    ngay: { type: DataTypes.DATE },
    hinh: {type: DataTypes.STRING},
    gia: {type: DataTypes.INTEGER  },
    an_hien:{ type:DataTypes.INTEGER},
  },
  { tableName:"san_pham" }
);
Thực tập quản trị dữ liệu với sequelize
Bây giờ thì mời bạn thực tập theo để học cách quản trị dữ liệu với sequelize nhé. Sau đây là các bước
Tạo project và cài sequelize và kết nối đến database
- Tạo một folder tên gì đó (ví dụ testSequelize), rồi chuyển vào folder mới tạo và chạy lệnh npm init

2. Cài các module cần thiết
npm install express
npm install nodemon
3. Mở file package.json và nhập thêm lệnh trong mục scripts như sau: “start”: “nodemon index”,
{
  "name": "testsequelize",
  "main": "index.js",
  "scripts": {
    "start": "nodemon index",
    "test": "echo \"Error: no test specified\" && exit 1"
  },
  "dependencies": {
    "express": "^4.21.2",
    "mysql2": "^3.12.0",
    "nodemon": "^3.1.9",
    "sequelize": "^6.37.5"
  }
}
4. Tạo đối tượng ứng dụng nodejs:
Trong folder project NodeJS, bạn tạo file index.js và code
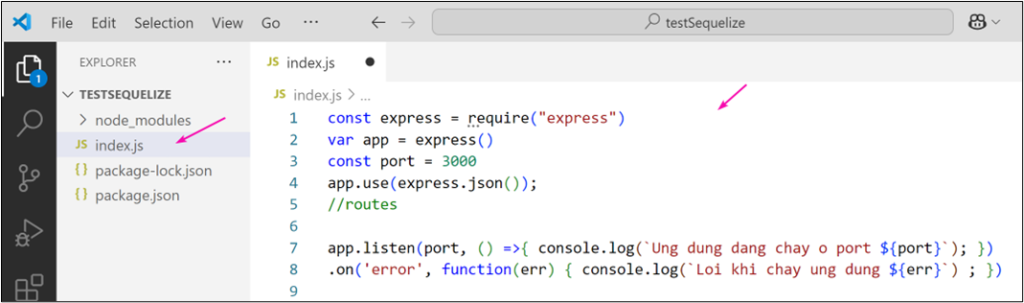
const express = require("express")
var app = express()
const port = 3000
app.use(express.json());
//routes
app.listen(port, () =>{ console.log(`Ung dung dang chay o port ${port}`); })
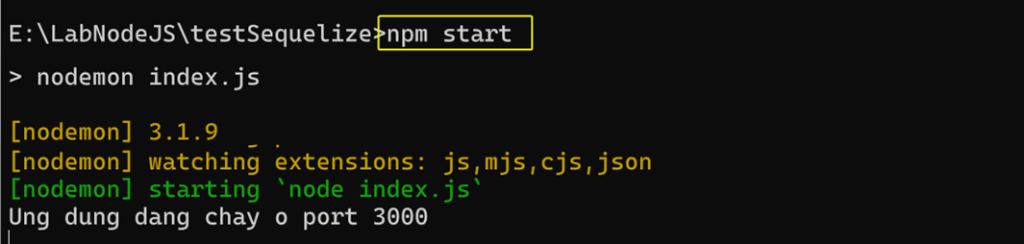
.on('error', function(err) { console.log(`Loi khi chay ung dung ${err}`) ; })5. Tiếp theo , trong command line, chạy ứng dụng với lệnh npm start
Cài sequelize và kết nối đến database
Giờ thì cài sequelize vào project NodeJS và cấu hình database. Thực hiện như sau:
- Trong command line, chạy 2 lệnh sau để cài sequelize kết nối đến mysql
npm install sequelize
npm install mysql2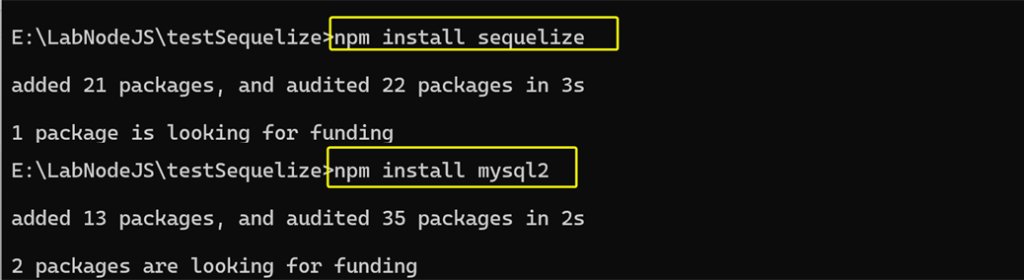
2. Kết nối đến database và tạo các model mô tả table:
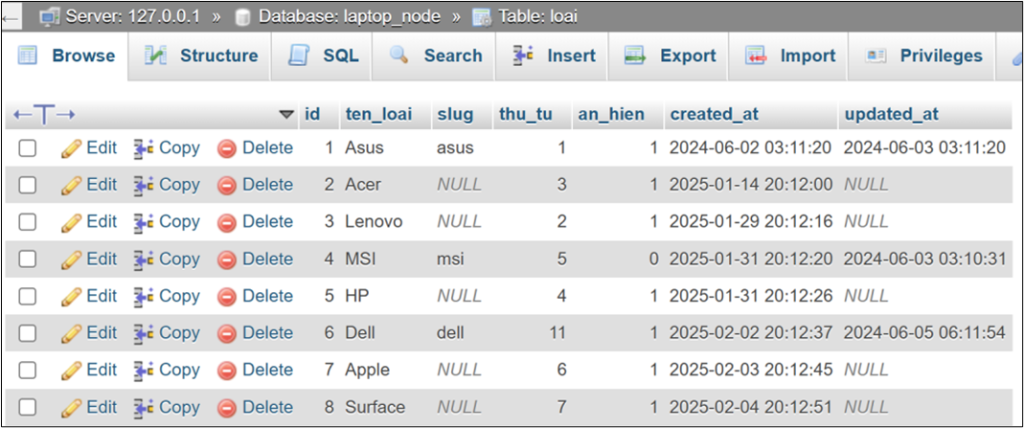
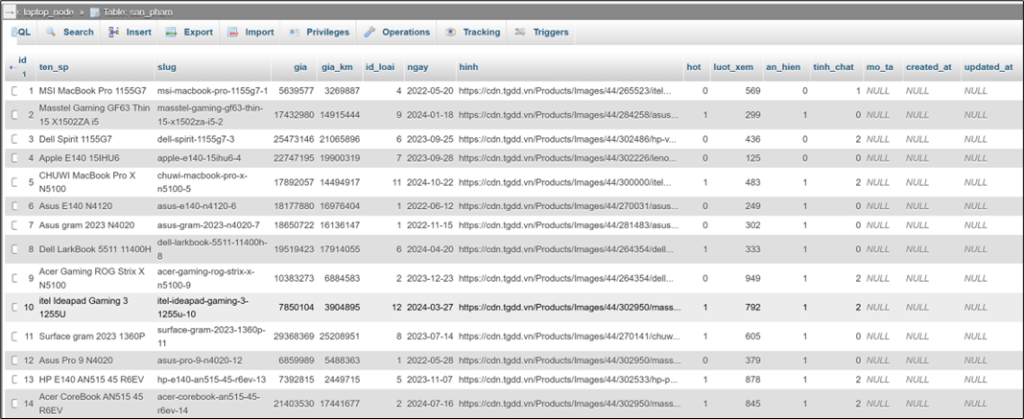
Giả sử bạn có database tên labtop_node có 2 table loại và san_pham như sau:
Bây giờ thì kết nối database nhé. Trong folder project , tạo 1 file có tên database.js và thực hiện kết nối database + mô tả các table :
const { Sequelize, DataTypes } = require('sequelize');
// Tạo đối tượng kết nối đến database
const sequelize = new Sequelize('laptop_node', 'root', '' , {
host: 'localhost', dialect: 'mysql'
});
// model mô tả table loai
const Loai = sequelize.define('loai', {
id :{type:DataTypes.INTEGER ,primaryKey:true, autoIncrement:true },
ten_loai: {type: DataTypes.STRING, allowNull:false },
thu_tu: { type: DataTypes.INTEGER, defaultValue:0 },
an_hien:{ type:DataTypes.INTEGER, defaultValue:0},
},
{ timestamps:false, tableName:"loai" }
);
// model diễn tả cấu trúc 2 table san_pham
const SP = sequelize.define('san_pham', {
id :{type:DataTypes.INTEGER ,primaryKey:true, autoIncrement:true },
ten_sp: {type: DataTypes.STRING },
ngay: { type: DataTypes.DATE },
gia: {type: DataTypes.INTEGER },
gia_km: {type: DataTypes.INTEGER },
id_loai:{ type:DataTypes.INTEGER},
hot:{ type:DataTypes.INTEGER},
an_hien:{ type:DataTypes.INTEGER},
hinh: {type: DataTypes.STRING},
},
{ timestamps:false, tableName:"san_pham" }
);
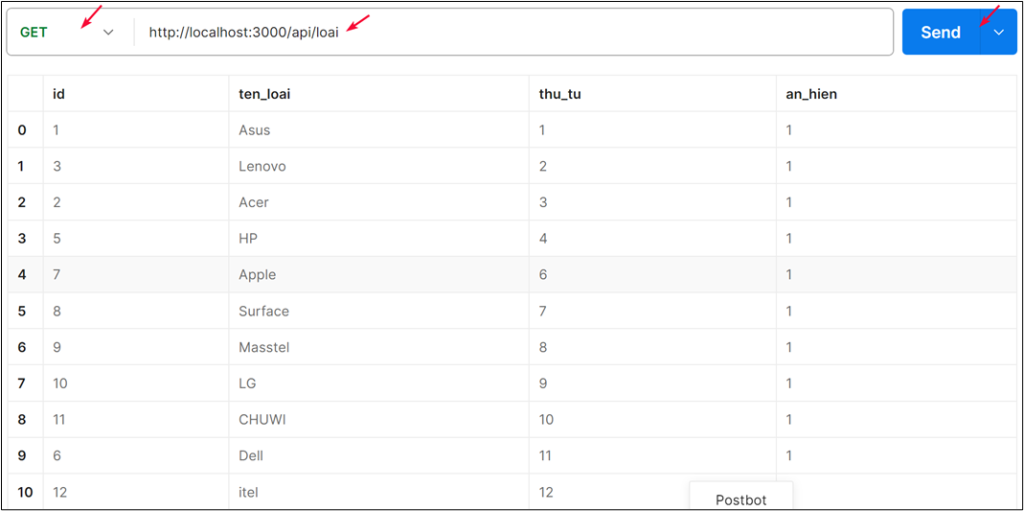
module.exports = { SP, Loai }Lấy danh sách dữ liệu trong table loại
Vậy là cấu hình database xong. Vậy lấy dữ liệu ra thế nào? Dễ thôi. Trong index.js , code dùng hàm findAll trong model để select dữ liệu
//routes
const {SP, Loai }  = require("./database.js")
app.get("/api/loai", async(req, res) =>{
    const loai_arr = await Loai.findAll(
    {
        where: { an_hien:1  },
        order: [ ['thu_tu', 'ASC']],
    })
    res.json(loai_arr);
})
Test với postman, bạn sẽ thấy dữ liệu lấy từ table
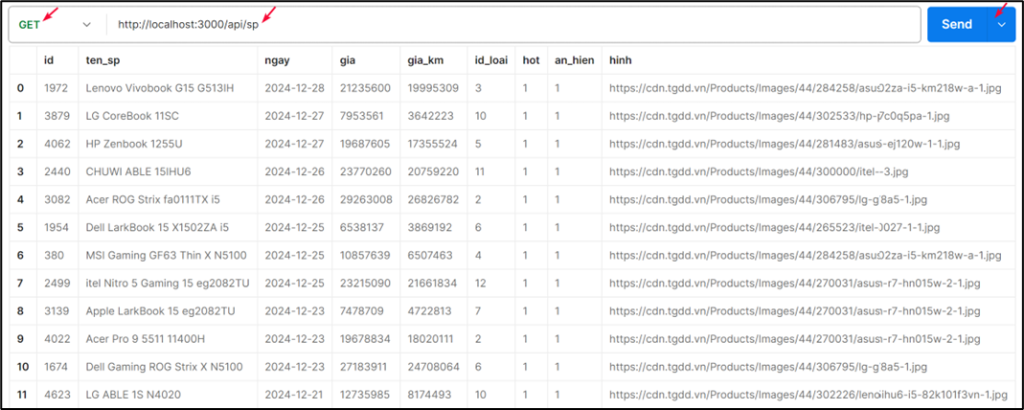
Lấy danh sách dữ liệu trong table sản phẩm
Thêm ví dụ nữa nhé, lấy dữ liệu từ table san_pham. Trong index.js , code dùng hàm findAll trong model để select dữ liệu
app.get("/api/sp", async(req, res) =>{
    const sp_arr = await SP.findAll({
        where: { an_hien:1, hot:1  },
        order: [ ['ngay', 'DESC'], ['gia', 'ASC'] ],
        offset: 0, limit: 12,
    })
    res.json(sp_arr);
})
Test với postman, bạn sẽ thấy dữ liệu lấy từ table
Tạo record mới trong table
Để tạo record mới trong table, dùng hàm create trong model. Trong index.js, code như sau
app.post("/api/sp", async(req, res) =>{
    let {ten_sp, gia, gia_km, hinh, id_loai } = req.body
    const kq = await SP.create({
        ten_sp: ten_sp,
        gia: gia ,
        gia_km: gia_km,
        id_loai:id_loai,
        hinh:hinh
    });
    res.json(kq);
})
Test với postman, request với method post và nhập dữ liệu cần chèn sẽ thấy OK
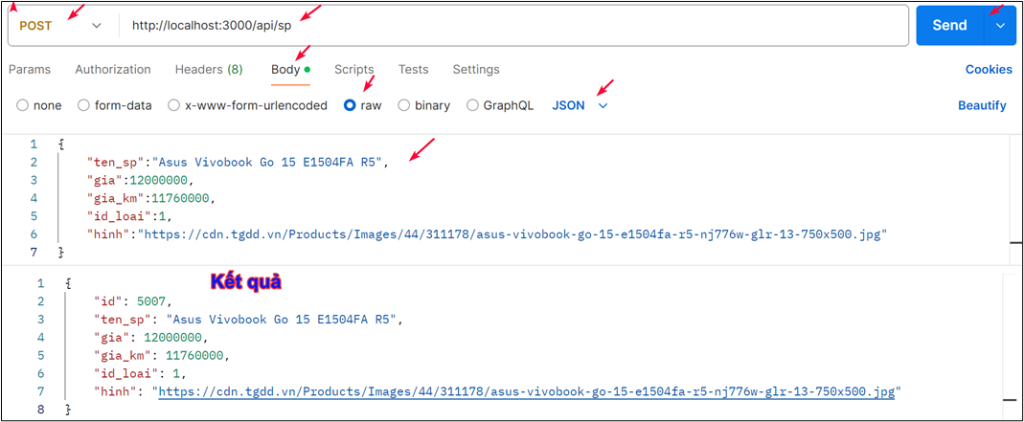
{
  "ten_sp":"Asus Vivobook Go 15 E1504FA R5",
  "gia":12000000,
  "gia_km":11760000,
  "id_loai":1,
  "hinh":"https://cdn.tgdd.vn/Products/Images/44/311178/asus-vivobook-go-15-e1504fa-r5-nj776w-glr-13-750x500.jpg"
}
Cập nhật record trong table
Để cập nhật record trong table, dùng hàm update trong model. Trong index.js, code như sau
app.put("/api/sp/:id", async(req, res) =>{
    let id = req.params.id;
    let {ten_sp, gia, gia_km, hinh, id_loai } = req.body
    const kq = await SP.update({
        ten_sp: ten_sp,
        gia: gia ,
        gia_km: gia_km,
        id_loai:id_loai,
        hinh:hinh
    },
    {  where: {id: id}   }
    );
    res.json(kq);
})
Test với postman, request với method put và nhập dữ liệu cần cập nhật (nhớ có id của record trong url) sẽ thấy OK

{
  "ten_sp":"Asus Vivobook Go 15 E1504FA",
  "gia":13000000,
  "gia_km":11760000,
  "id_loai":1,
  "hinh":"https://cdn.tgdd.vn/Products/Images/44/311178/asus-vivobook-go-15-e1504fa-r5-nj776w-glr-13-750x500.jpg"
}
Xóa record trong table
Để xóa record trong table, dùng hàm destroy trong model. Trong index.js, code như sau
app.delete("/api/sp/:id", async(req, res) =>{
    let id = req.params.id;
    const kq = await SP.destroy({ where: {id: id} });
    res.json(kq);
})
Test với postman, request với method delete và nhập dữ liệu cần xóa (nhớ truyền id trong url) sẽ thấy OK

Sequelize là một thư viện hay lắm đó. Sử dụng Sequelize trong NodeJS giúp tương tác với database dễ dàng mà không phải viết quá nhiều SQL thủ công. Những tính năng của sequelize còn nữa. Mời bạn xem tiếp trong bài sau.


