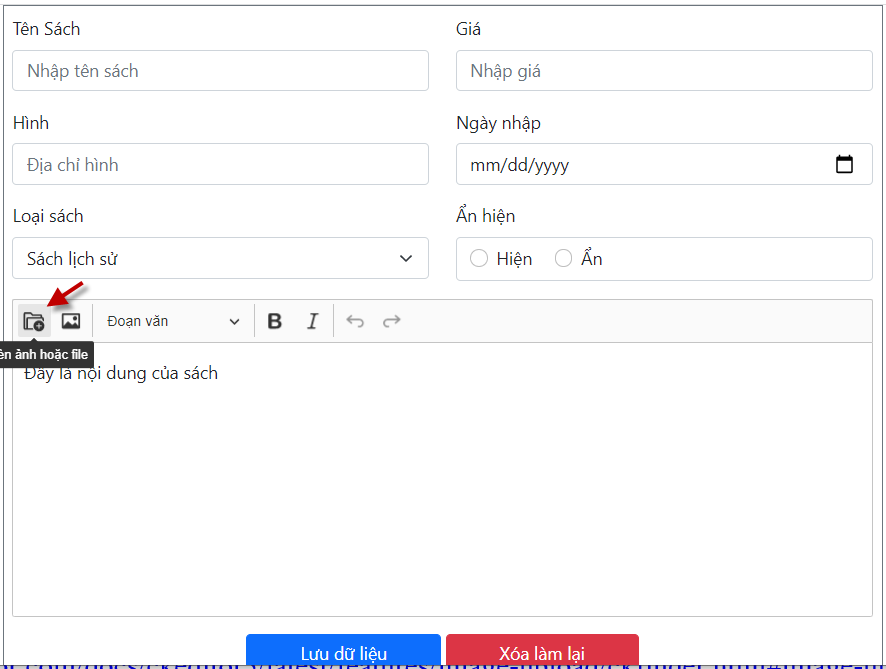
Sử dụng WebEditor hướng dẫn biến textarea thành vùng soạn thảo như Word trong trang web, thích hợp dùng cho nội dung tin, mô tả sản phẩm…
Chuẩn bị
- Bạn tạo một trang web với form có sẵn để sử dụng webeditor
- Thực hiện tạo database hocPHP (nếu chưa tạo) và tạo table sach gồm các field: id, tensach, gia, urlhinh, ngay, idloai, anhien,mota
Tạo form để sử dụng webeditor
Trong website, tạo 1 file có tên formThemSach.php và code:
<link href="https://cdn.jsdelivr.net/npm/bootstrap@5.1.3/dist/css/bootstrap.min.css" rel="stylesheet">
<div class="m-auto border border-secondary p-2" style="width:800px">
<form method="post" class="row" enctype='multipart/form-data' >
    <div class="mb-3 col-6">
       <label class="form-label">Tên Sách</label>
       <input name="tensach" placeholder="Nhập tên sách" class="form-control" type="text">
    </div>
    <div class="mb-3 col-6">
       <label class="form-label">Giá</label>
       <input name="gia" placeholder="Nhập giá" type="number" class="form-control">
    </div>
    <div class="mb-3 col-6">
        <label class="form-label">Hình</label>
        <input name="hinh" placeholder="Địa chỉ hình" type="text" class="form-control" >
    </div>
    <div class="mb-3 col-6">
        <label class="form-label">Ngày nhập</label>
        <input name="ngay" type="date" class="form-control" >
    </div>
    <div class="mb-3 col-6">
        <label class="form-label">Loại sách</label>
        <select name="loaisach" class="form-select" >
            <option selected> Sách lịch sử </option>
            <option value="1">Văn học </option>
            <option value="2">Nghệ thuật sống</option>
            <option value="3">Học làm người</option>
        </select>
    </div>
    <div class="mb-3 col-6">
        <label class="form-label">Ẩn hiện</label>
        <div class="form-control">
            <div class="form-check form-check-inline">
                <input name="anhien" id="hien" value="1" class="form-check-input" type="radio">
                <label class="form-check-label" for="hien">Hiện</label>
            </div>
            <div class="form-check form-check-inline">
                <input name="anhien" id="an" value="0" class="form-check-input" type="radio" >
                <label class="form-check-label" for="an">Ẩn</label>
            </div>
        </div>
    </div>
  <div class="mb-3">
    <textarea id="mota" name="mota" rows="4" placeholder="Mô tả" class="form-control"></textarea>
  </div>
   <div class="text-center">
       <button name="btnLuu" type="submit" class="btn btn-primary py-1 px-5">Lưu dữ liệu</button>
       <button type="reset" class="btn btn-danger py-1 px-5">Xóa làm lại</button>
  </div>
</form>
</div>

Dùng CkEditor
CKEditor là 1 WebEditor rất dễ dùng, nó biến textarea thành vùng soạn thảo giống như word. Và khi submit form, nó phát sinh code html để gửi lên server.
- Download: https://ckeditor.com/ckeditor-5/download/
- Xem ví dụ: https://ckeditor.com/docs/ckeditor5/latest/examples/index.html

<script>
ClassicEditor
    .create( document.querySelector( '#mota' ) )
    .then( editor => {
        console.log( editor );
    } )
    .catch( error => {
        console.error( error );
    } );
</script>
Hiện ra nội dung của editor
Cách 1: Bạn gõ nội dung trong tag textarea hoặc hiện từ database, ví dụ: <?=$sach[‘mota’]?>
<textarea id="mota" name="mota" rows="4" placeholder="Mô tả" class="form-control">
   <p>Đây là nội dung của sách</p>
</textare
Hoặc gán trong lúc khởi tạo với hàm setdata
<script>
ClassicEditor
    .create( document.querySelector( '#mota' ) )
    .then( editor => {
        editor.setData( '<p>Nội dung của sách lấy từ database</p>' );
    } )
    .catch( error => {
        console.error( error );
    } );
</script>
Lấy giá trị từ editor: khi cần có thể lấy data trong editor bằng hàm getdate
<button type="button" onclick="laydata()">Lấy data</button>
<script>
var ed;
ClassicEditor.create( document.querySelector( '#mota' ) )
.then( editor => {
    editor.setData( '<h4>Nội dung của sách lấy từ database</h4>' );
    ed = editor;
})
.catch( error => {console.error( error )} );
</script>

<script>
function laydata(){
    e = ed.getData();
    console.log(e);
}
</script>
Tiếng việt cho editor:
Thêm code này vào trang :
<script src="https://cdn.ckeditor.com/ckeditor5/31.0.0/classic/translations/vi.js"> </script><script>
ClassicEditor.create( document.querySelector('#mota') , {language: 'vi'} )
.then( editor => { } )
.catch( error => {console.error( error )} );
</script>
Chỉnh độ cao cho Ckeditor
Thêm style định dạng cho vùng soạn thảo:
<style>
.ck-editor__editable_inline {
    min-height: 250px;
    max-height: 450px;
}
</style>
Lưu dữ liệu trong Editor vào db
Cứ làm bình thường như đã biết. Xem thử để biết cấu trúc của $_POST
<?php
if ( isset( $_POST['btnLuu'])) {
    echo "<xmp>"; print_r($_POST);
}
?>
Sử dụng CKFinder trong file urlHinh
a. Download CKFinder : https://ckeditor.com/ckfinder/download/
b. Giải nén và chép folder ckfinder vào website
c. Vào https://ckeditor.com/docs/ckfinder/ckfinder3/#!/guide/dev_integration , cuộn xuống mục để xem code demo ở mục Using CKFinder in a Popup Window
 <head>
     <meta charset="utf-8">  <title>CKFinder 3</title>
     <script src="/ckfinder/ckfinder.js"></script>
 </head>
 <body>
     <script>
         function openPopup() {
             CKFinder.popup( {
                 chooseFiles: true,
                 onInit: function( finder ) {
                     finder.on( 'files:choose', function( evt ) {
                         var file = evt.data.files.first();
                         document.getElementById( 'url' ).value = file.getUrl();
                     } );
                     finder.on( 'file:choose:resizedImage', function( evt ) {
                         document.getElementById( 'url' ).value = evt.data.resizedUrl;
                     } );
                 }
             } );
         }
     </script>
     <input type="text" size="48" name="url" id="url" /> <button onclick="openPopup()">Select file</button>
 </body>
Trong code trên , chú ý có tag input với tên url, hàm openPopup sẽ được gọi khi click nút Select file
d. Mở trang web của bạn, nhúng script ckfinder.js vào
<script src="ckfinder/ckfinder.js">e. Trong sự kiện click của input hinh, gọi hàm openPopup
<input ondblclick="openPopup('hinh')" id="hinh" name="hinh" placeholder="Địa chỉ hình" type="text" class="form-control" > f. Định nghĩa hàm openPopup
<script>
function openPopup(idobj) {
    CKFinder.popup( {
        chooseFiles: true,
        onInit: function( finder ) {
            finder.on( 'files:choose', function( evt ) {
                var file = evt.data.files.first();
                document.getElementById( idobj ).value = file.getUrl();
            } );
            finder.on( 'file:choose:resizedImage', function( evt ) {
                document.getElementById( idobj ).value = evt.data.resizedUrl;
            } );
        }
    } );
}
</script>
g. Mở file ckfinnder/config.php, tìm đến mục anthentication, sửa false thành true
$config['authentication'] = function () {
    return true;//false;
};
Xong rồi, hưởng thành quả nhé
Sử dụng CKFinder để nhúng hình vào CkEditor
- Trong trang https://ckeditor.com/docs/ckfinder/ckfinder3/#!/guide/dev_ckeditor5 , mở CKEditor Interation, nhắp CKEditor 5 và xem code mẫu để nhúng Ckfinder trong CKEdor

Trong trang web của bạn, cuộn đến vùng code nhúng CkEdior, và thêm code như mẫu để được như sau:
<script>
ClassicEditor.create( document.querySelector('#mota') , {
    language: 'vi',
    ckfinder: {
        uploadUrl: 'ckfinder/core/connector/php/connector.php?command=QuickUpload&type=Files&responseType=json'
    },
    toolbar: [ 'ckfinder', 'imageUpload', '|', 'heading', '|', 'bold', 'italic', '|', 'undo', 'redo' ]
})
.then( editor => {   })
.catch( error => {console.error( error )} );
</script>
Kết quả, nhắp nút chèn hình trong toolbar thì CKFinder sẽ bật lên

Điều chỉnh các nút trong toolbar của CkEditor
- Vào trang này để xem mẫu : https://ckeditor.com/docs/ckeditor5/latest/features/toolbar/toolbar.html
- Thử thêm vào trong editor của bạn :
<script>
ClassicEditor.create( document.querySelector('#mota') , {
    language: 'vi',
    ckfinder: {
        uploadUrl: 'ckfinder/core/connector/php/connector.php?command=QuickUpload&type=Files&responseType=json'
    },
    toolbar: {
    items: [
        'fontfamily', 'fontsize', '|',
        'heading', '|',
        'alignment', '|',
        'fontColor', 'fontBackgroundColor', '|',
        'bold', 'italic', 'underline', 'subscript', 'superscript', '|',
        'link', '|',
        'outdent', 'indent', '|',
        'bulletedList', 'numberedList', 'todoList', '|',
        'code', 'codeBlock', '|',
        'insertTable', '|',
        'uploadImage', '|',
        'ckfinder',
        'undo', 'redo'
    ],
    shouldNotGroupWhenFull: true
}
})
.then( editor => {   })
.catch( error => {console.error( error )} );
</script>


