Build code với webpack để để đóng gói code trong dự án thành code javascript chuẩn, nhỏ gọn, tránh code dư thừa, an toàn, chạy nhanh.
Chuẩn bị project để build code với webpack
1. Tạo cấu trúc file folder như sau để chuẩn bị build code
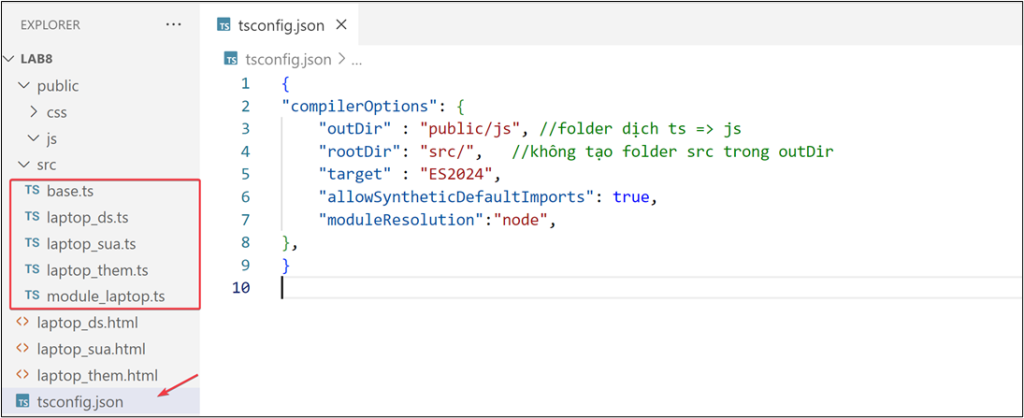
Trong đó folder src chứa các file .ts, .html và code javascript .
2. Cấu hình typescript
Code cho file tsconfig.json để quy định cách build code cơ bản typescript trong project
{
    "compilerOptions": {
        "outDir" : "public/js", //folder dịch ts => js
        "rootDir": "src/",  //không tạo folder src trong outDir
        "target" : "ES2024",
        "allowSyntheticDefaultImports": true,
        "moduleResolution":"node",
    },
}
3. Tạo vài trang html để chuẩn bị build
– file laptop_ds.html
<body> <main></main> </body>
<script src="public/js/laptop_ds.js" type="module"></script>
- file laptop_them.html
<body> <main></main> </body>
<script src="public/js/laptop_them.js" type="module"></script>
- file laptop_sua.html
<body> <main></main> </body>
<script src="public/js/laptop_sua.js" type="module"></script>
3. Tạo vài module để chuẩn bị build code với webpack
a. File src/base.ts code xong thì biên dịch để có file .js
export const urlAPI:string = "http://localost:4000";
export const pageSize:number = 10;
export interface sanpham {id?:number; ten:string; gia:number; }
export interface nhasx {id:number; ten:string;}
b. File src/module_laptop.js, code xong thì biên dịch để có file .js
import {sanpham} from './base.js'
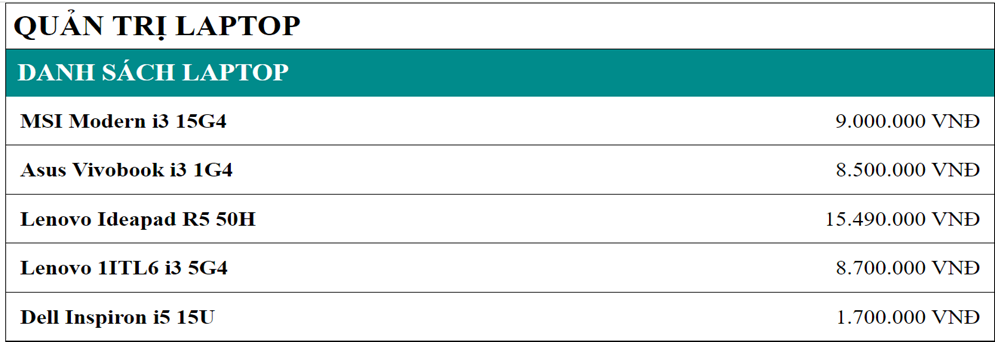
export const title:string = "QUẢN TRỊ LAPTOP";
export const danhSachLT = ():string => {
let sp1:sanpham = { id:1, ten:'MSI Modern i3 15G4', gia:9000000 }
return `<p><b>${sp1.ten}</b> <span>${sp1.gia}</soan> </p>`
}
export const formThemLT = ():string => {
return `<form>
<p>Tên <input name='ten'></p>
<p>Giá <input type='number' name='gia'></p>
<p><button type='button' name='btn'>Thêm</button></p>
</form> `
}
export const themLT = (data:sanpham):void => {
/* Code gửi thêm laptop lên server*/
}
export const formSuaLT = (id:number):string => {
return `<form>
<p>Tên <input name='ten'></p>
<p>Giá <input type='number' name='gia'></p>
<p><button type='button' name='btn'>Cập nhật</button></p>
<input type='hidden' name='id' value='${id}'>
</form>`
}
export const suaLT = (id:number, data:sanpham):void => {
/* gửi cập nhật lên server*/
}
export const xoaLT = (id:number):void => {
/* gửi yêu cầu xóa laptop lên server*/
}
export const chitietLT = (id:number):void => {
/*gửi yêu cầu xóa laptop lên server*/
}
export const timkiemtLT = (tukhoa:string):void => {
/* code lấy laptop theo từ khóa*/
}
export * from './base.js'
c. File src/laptop_ds.ts , xong thì biên dịch để có file .js
import { danhSachLT, xoaLT,  title} from './module_laptop.js'
let show = document.querySelector("main")  as HTMLElement;
show.innerHTML=`<h2>${title}</h2>`;
show.innerHTML+=`<h3>DANH SÁCH LAPTOP</h3>`;
show.innerHTML+=danhSachLT();
function btnXoa_click(id:number){ xoaLT(id);  alert('Đã xóa');  }
d. File src/laptop_them.ts , xong thì biên dịch để có file .js
import { formThemLT, themLT, title, sanpham} from './module_laptop.js'
let show = document.querySelector("main")  as HTMLElement;
show.innerHTML= `<h2>${title}</h2>`;
show.innerHTML+=`<h3>THÊM LAPTOP</h3>`;
show.innerHTML+= formThemLT();
let form = document.querySelector("main form")  as HTMLFormElement;
form.btn.onclick = function(){
    let data:sanpham = {ten:'a', gia:11 }
    themLT(data); alert('Đã thêm')
}
d. File src/laptop_sua.ts , xong thì biên dịch để có file .js
import { formSuaLT, suaLT, title, sanpham} from './module_laptop.js'
let params = new URLSearchParams(location.search);
let id = Number(params.get("id"));
let show = document.querySelector("main")  as HTMLElement;
show.innerHTML=`<h2>${title}</h2>`;
show.innerHTML+=`<h3>SỬA LAPTOP</h3>`;
show.innerHTML+=formSuaLT(id);
let form = document.querySelector("main form")  as HTMLFormElement;
form.btn.onclick = function(){
    let data:sanpham = {id:id, ten:'a', gia:11 }
    suaLT(id, data);
}
Xem thử các trang html và định dạng cho đẹp nhé. Có thể tham khảo để định dạng như sau

Biên dịch code typescript
Đến đây, biên dịch lần cuối với lệnh tsc để đảm bảo các file đã được dịch vào public/js . Xử lý các lỗi nếu có để bước tiếp theo (build code) chạy tốt.
tsc
Thực hiện build code với webpack
Sau đây là các bước thực hiện build code với webpack. Code project đã được chuẩn bị ở phần trên.
Cài webpack
Chạy lệnh sau trong folder project của bạn: npm install webpack webpack-cli . Sau khi cài xong, project đã có các module cần dùng. Giờ thì tạo file cấu hình để cho webpack hoạt động.
Tạo file cấu hình cho webpack
Trước khi thực hiện buildcode với webpack, bạn cần tạo file cấu hình cho nó. Trong folder project tạo file webpack.config.js và code
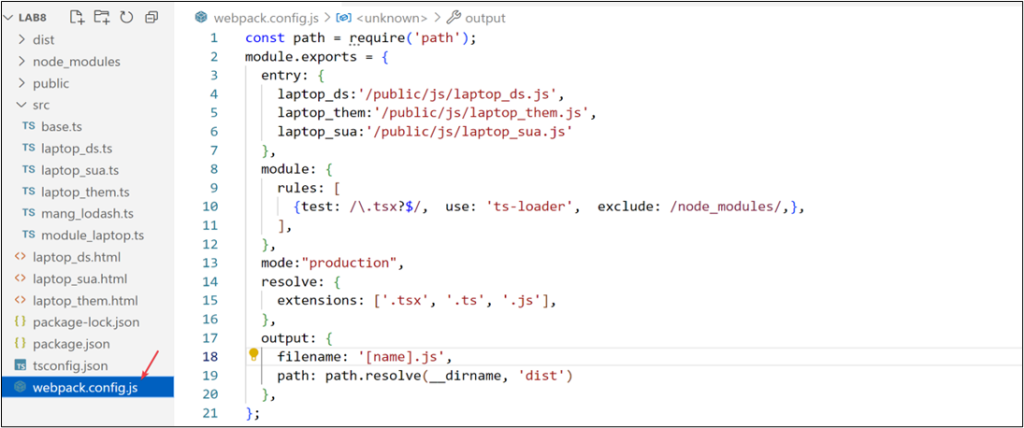
Trong webpack.config.js ,Mục entry – là địa chỉ các file khởi chạy để build , output – là folder kết xuất khi dịch từ ts sang js. mode là chế độ chạy code sau khi webpack build. dist là folder chứa các file sau khi build
Thực hiện build code
– Mở file package.json: và thêm mục
"scripts": {
"build": "webpack"
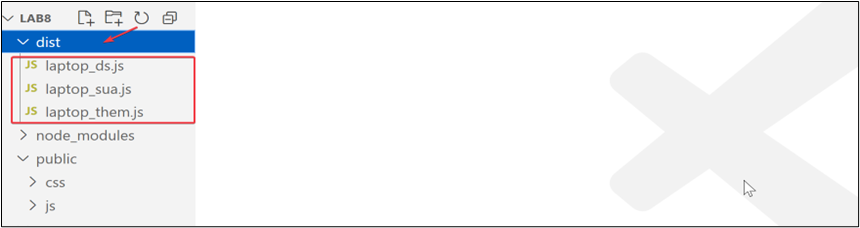
},– Chạy lệnh sau để build code với webpack: npm run build . Chạy xong thì folder project sẽ có folder dist chứa các file js đã được build . Mở lên để xem nhé. Các hằng số sẽ đựợc thay thế bằng giá trị của nó, các biến, hàm khai báo mà không dùng cũng sẽ bị bỏ qua.
Cài và sử dụng thư viện lodash
Lodash là thư viện hay, cung cấp nhiều hàm hữu ích để bạn dùng trong lập trình javascript, typescript. Để cài thêm lodash trong project typescript, chạy lệnh sau:
npm install lodash @types/lodash
Giờ thì trong folder src tạo mới 1 file typesrcipt (ví dụ mang_lodash.ts ) để thử, code như sau :
import * as _ from "lodash";
let arr =  [1258, 938, 1954, 1285, 1428 ];
let lonnhat = _.max(arr);
let nhonhat = _.min(arr);
let tong = _.sum(arr);
console.log(lonnhat, nhonhat, tong);
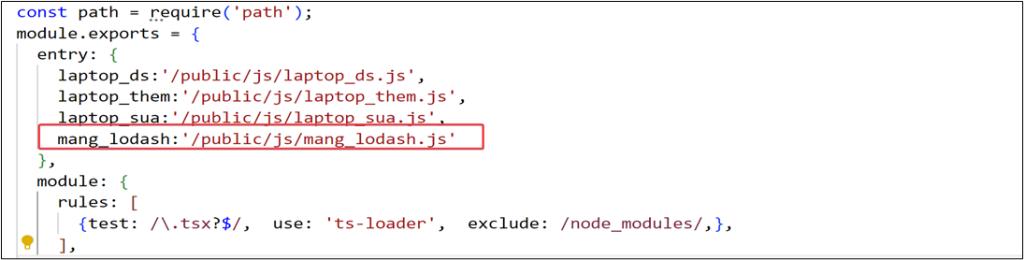
Mở file webpack.config.js và khai báo thêm entry
Build lại code : npm run build Xong tìm trong dist/public/js phải có file mang_lodash.js. Bạn tạo mới file dist/mang_lodash.html và nhúng file .js vừa mới build để chạy thử nhé.
Cần tham khảo thêm, xem link này nhé https://webpack.js.org/guides/typescript/, https://www.typescriptlang.org/docs/handbook/declaration-files/consumption.html


